> ## Documentation Index
> Fetch the complete documentation index at: https://docs.rankai.ai/llms.txt
> Use this file to discover all available pages before exploring further.
# WordPress blog integration guide
> Connect your WordPress site to RankAI in three simple steps. You’ll enter your site URL, create an application password in WordPress, then connect your credentials in RankAI.
This guide walks you through connecting your WordPress site to RankAI so we can publish and manage your SEO and AEO content. You’ll need access to your WordPress admin and your RankAI dashboard.
## Where to start in RankAI
In your RankAI project, open **Settings** in the sidebar. Under **Site Integration**, find **Connected CMS** and click **Configure**.
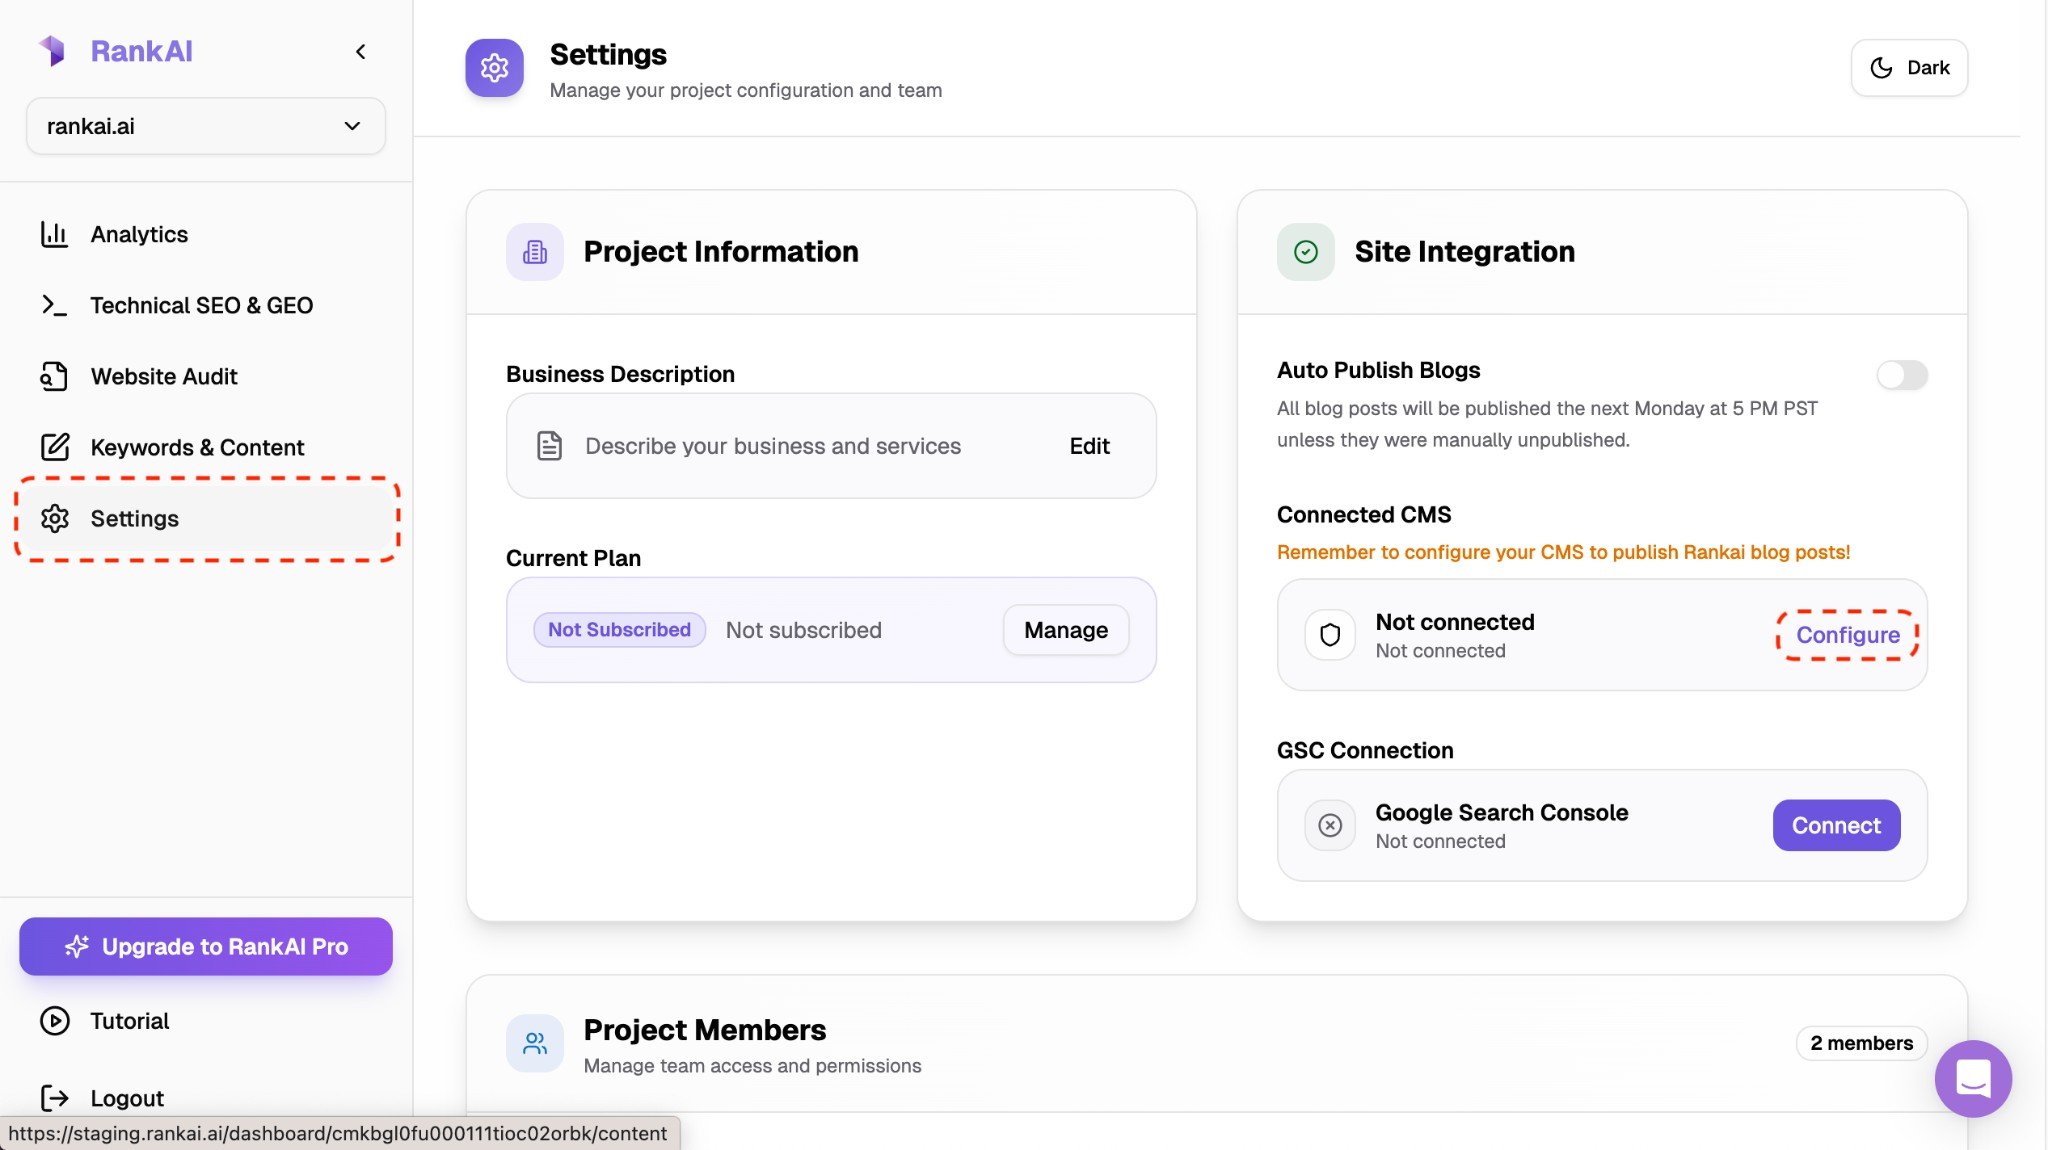 *Settings → Site Integration → Configure under Connected CMS.*
On the next screen, you’ll see **All Integrations**. Click the **WordPress** card to continue.
*Settings → Site Integration → Configure under Connected CMS.*
On the next screen, you’ll see **All Integrations**. Click the **WordPress** card to continue.
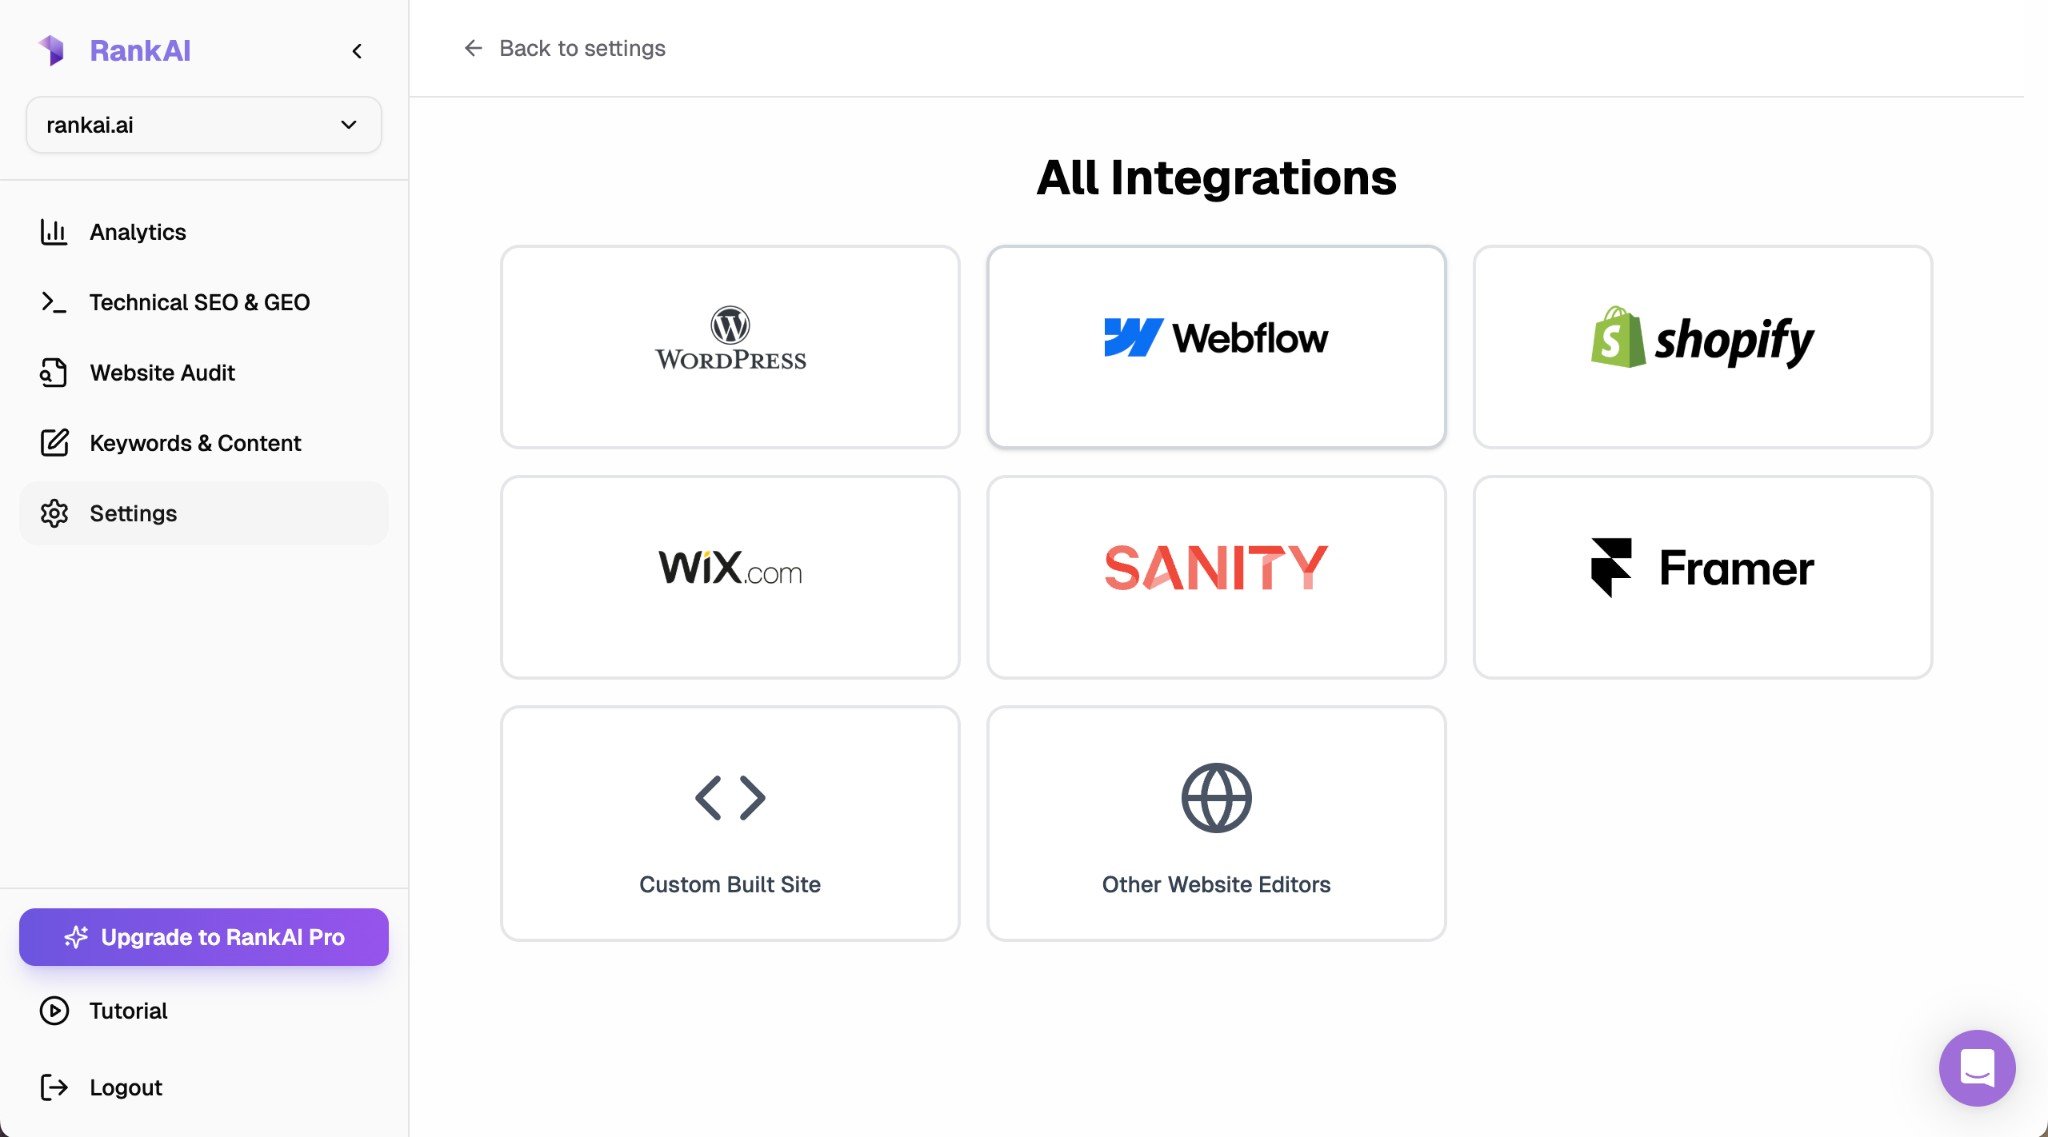 *Select WordPress from the integrations list.*
## Step 1: Enter your site URL
In your RankAI project, go to the integration settings and enter your WordPress site URL in the **Site URL** field.
*Select WordPress from the integrations list.*
## Step 1: Enter your site URL
In your RankAI project, go to the integration settings and enter your WordPress site URL in the **Site URL** field.
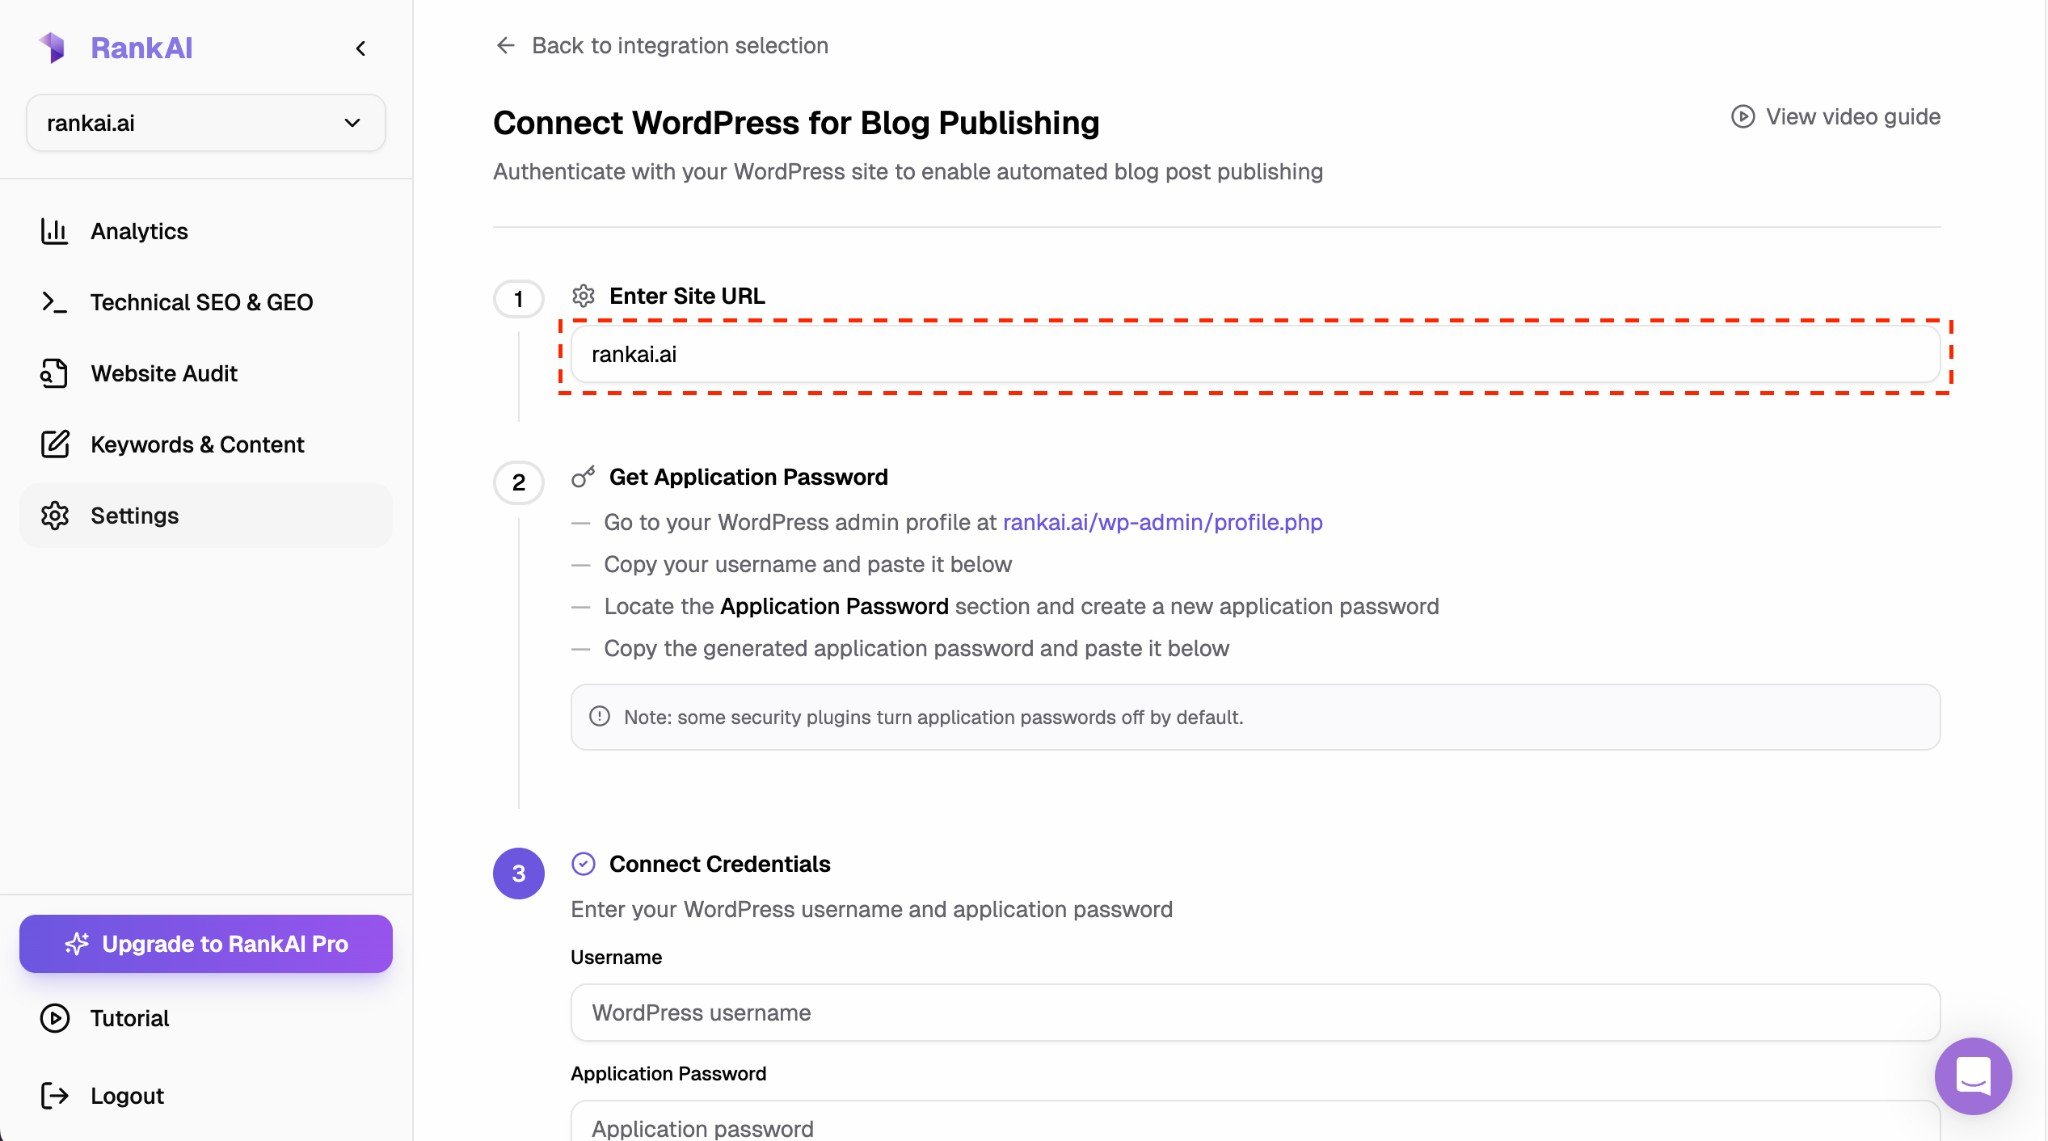 *Enter your WordPress site URL in the first field (e.g. rankai.ai or [https://rankai.ai](https://rankai.ai)).*
## Step 2: Get an application password from WordPress
RankAI connects to WordPress using an **application password**. This is more secure than using your normal login password and can be revoked anytime from WordPress. Go to your WordPress admin profile at `yourdomain.com/wp-admin/profile.php` (click your name in the top right, then **Edit Profile**).
### 2.1 Copy your username
Find your **username** (the one you use to log in to WordPress). Copy it—you'll paste it into RankAI in Step 3. Do not use your email address unless that is your actual WordPress username.
*Enter your WordPress site URL in the first field (e.g. rankai.ai or [https://rankai.ai](https://rankai.ai)).*
## Step 2: Get an application password from WordPress
RankAI connects to WordPress using an **application password**. This is more secure than using your normal login password and can be revoked anytime from WordPress. Go to your WordPress admin profile at `yourdomain.com/wp-admin/profile.php` (click your name in the top right, then **Edit Profile**).
### 2.1 Copy your username
Find your **username** (the one you use to log in to WordPress). Copy it—you'll paste it into RankAI in Step 3. Do not use your email address unless that is your actual WordPress username.
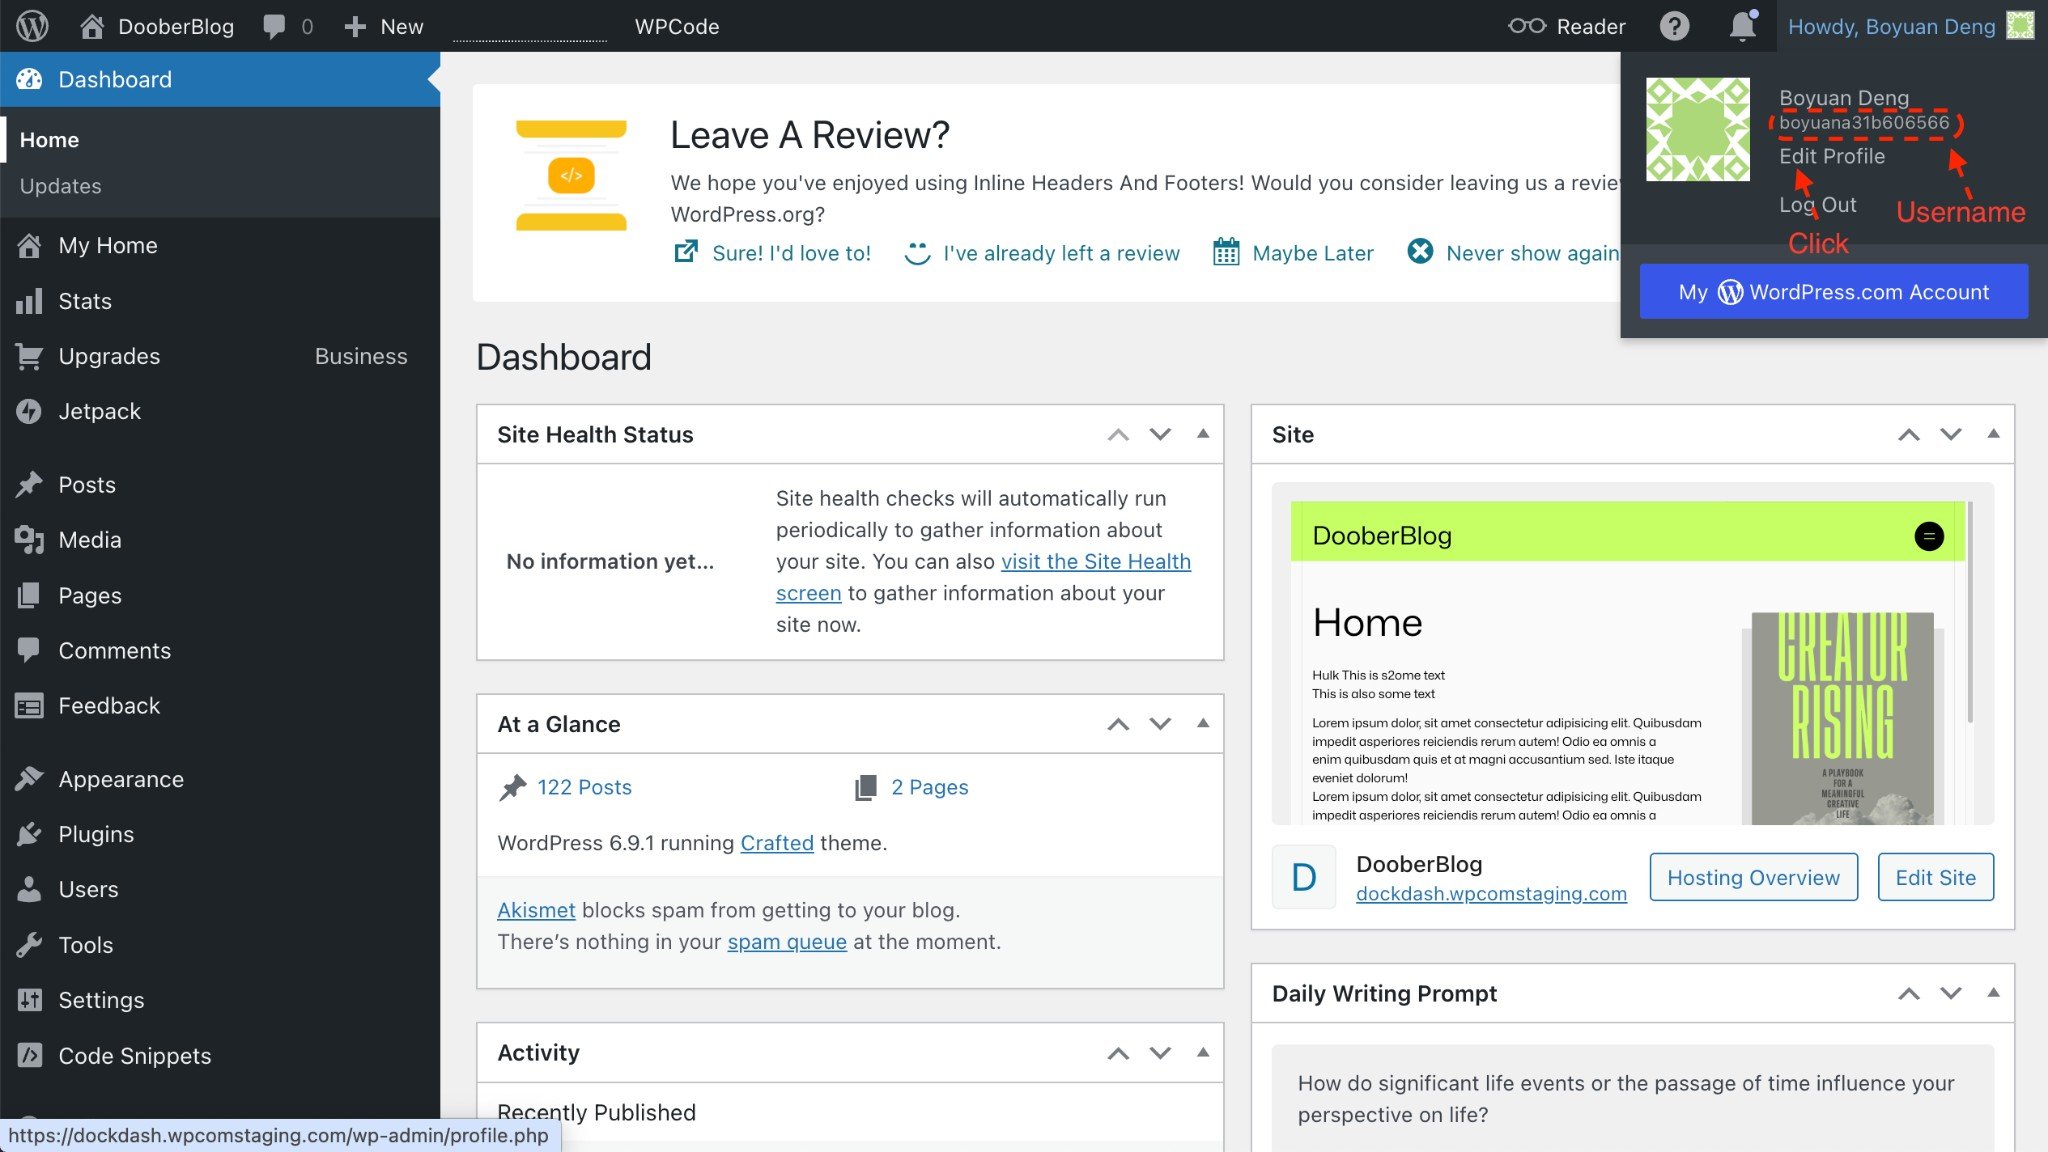 *You can also find your username under **Users → All Users**. Copy the username (e.g. @yourusername) for Step 3.*
### 2.2 Create an application password
Scroll to the **Application Passwords** section. If you don’t see it, your WordPress may be older than 5.6 or the feature may be disabled (see the note below).
* In the “New Application Password Name” field, enter a label (e.g. “RankAI”).
* Click **Add New Application Password**.
* WordPress will show a generated password **once**. Copy it immediately and store it somewhere safe—you won’t be able to see it again.
*You can also find your username under **Users → All Users**. Copy the username (e.g. @yourusername) for Step 3.*
### 2.2 Create an application password
Scroll to the **Application Passwords** section. If you don’t see it, your WordPress may be older than 5.6 or the feature may be disabled (see the note below).
* In the “New Application Password Name” field, enter a label (e.g. “RankAI”).
* Click **Add New Application Password**.
* WordPress will show a generated password **once**. Copy it immediately and store it somewhere safe—you won’t be able to see it again.
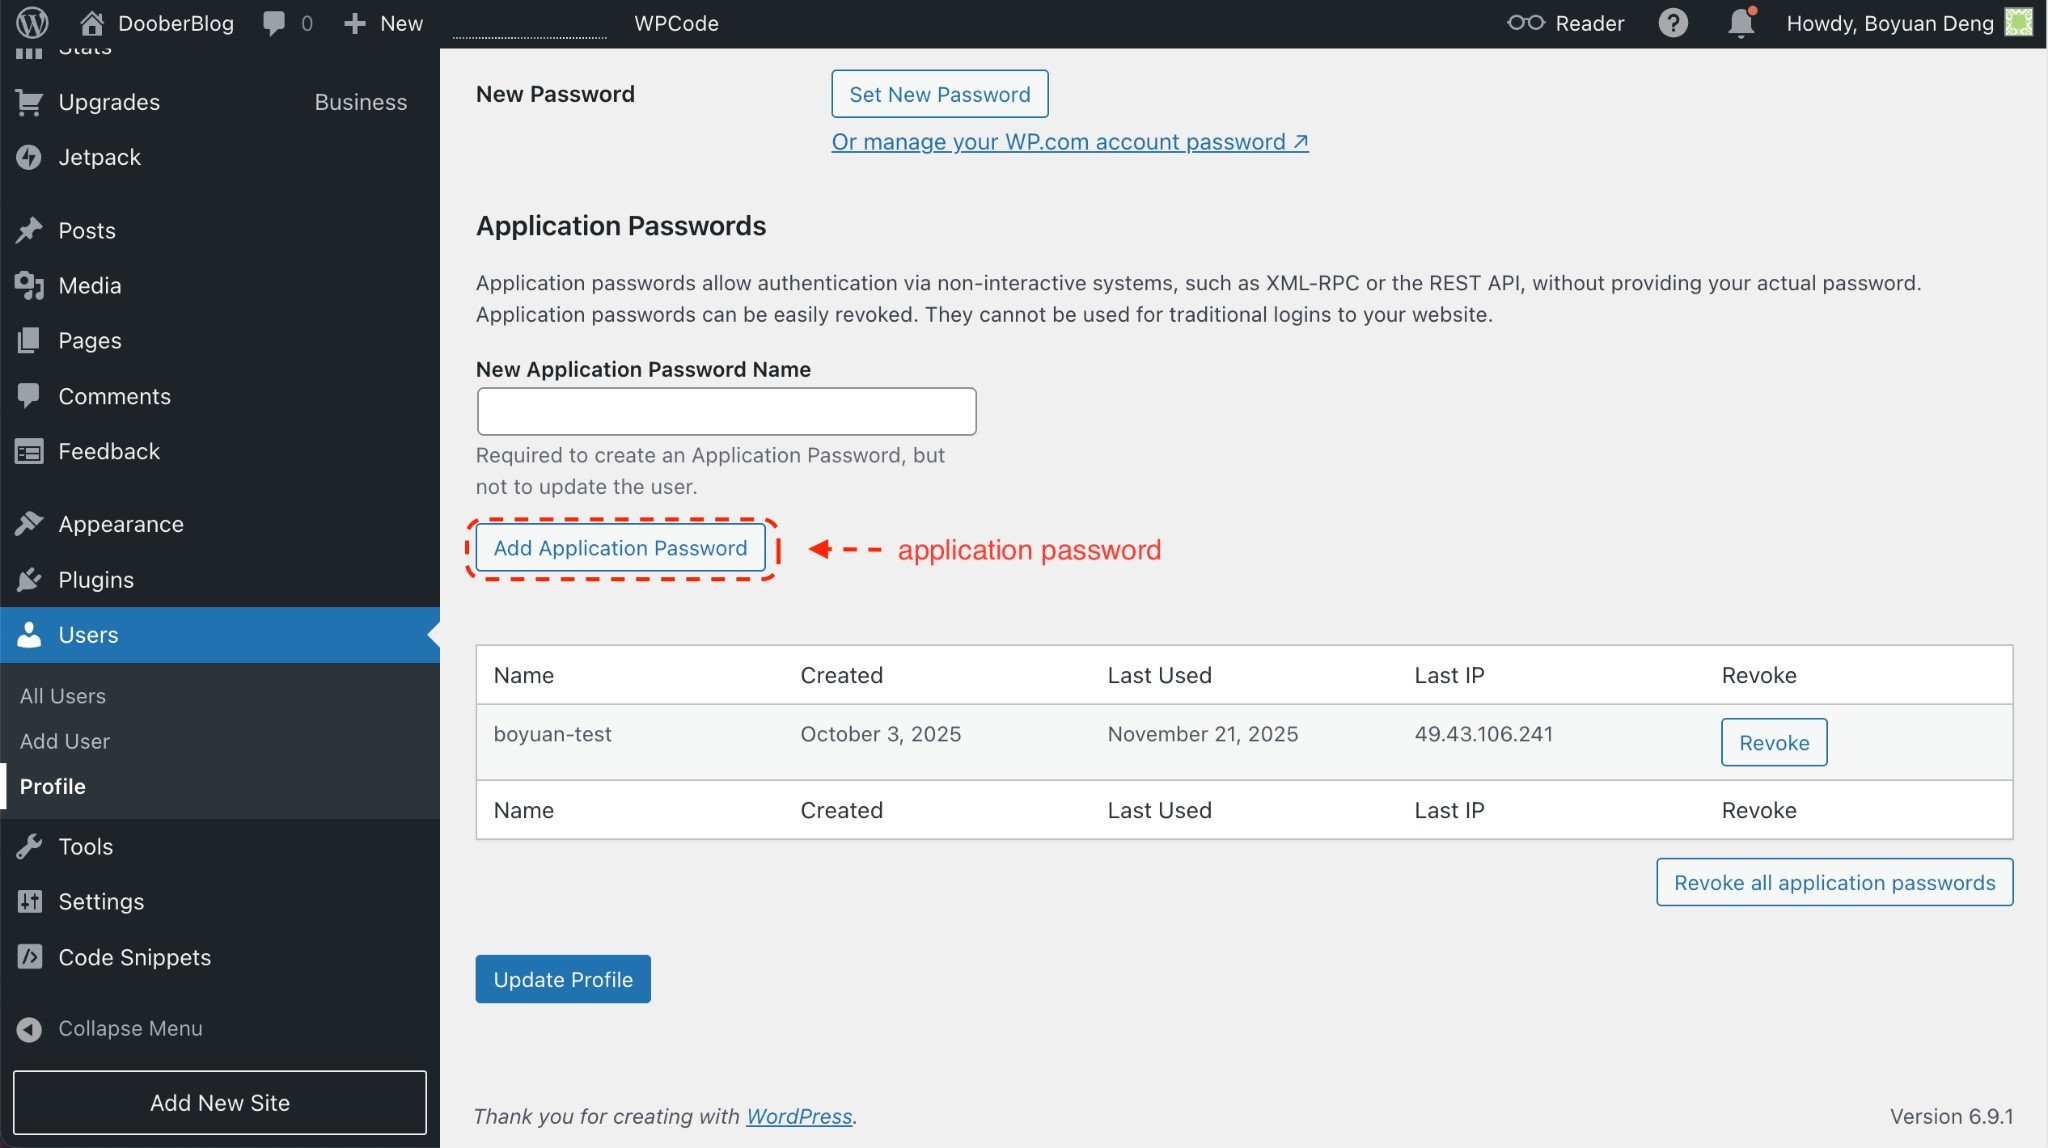 *Scroll to **Application Passwords**, enter a name (e.g. “RankAI”), then click **Add Application Password**. Copy the generated password once it appears.*
Paste this application password into RankAI in Step 3.
Note
Some security plugins turn application passwords off by default. If you don’t see the Application Passwords section, check your security or login plugin settings and enable application passwords for your user (or temporarily disable the restriction) so you can create one.
## Step 3: Connect your credentials in RankAI
Back in your RankAI project, open the WordPress integration screen. Enter your WordPress username and the application password you created, then click **Connect**.
Connect credentials
Enter your WordPress username and application password.
**Username:** WordPress username.
**Application Password:** Application password.
**Username:** Paste the WordPress username you copied in Step 2.1.
**Application Password:** Paste the application password WordPress generated in Step 2.2 (the long string with spaces—you can paste it with or without spaces; RankAI will accept either).
Click **Connect**. RankAI will verify the credentials and connect your site. Once connected, you can manage publishing and content settings from your RankAI dashboard.
## FAQ
### What if the connection fails?
Double-check that (1) your site URL is correct and reachable, (2) your username matches your WordPress login, and (3) you’re using the application password (not your normal WordPress password).
### I don’t see the Application Passwords section in WordPress. What do I do?
Some security plugins turn application passwords off by default. Check your security or login plugin settings and enable application passwords for your user (or temporarily disable the restriction) so you can create one.
### Where can I get more support?
Contact your RankAI account team or check the help section in your dashboard.
## Install the technical SEO & AEO script
The CMS connection above handles articles. Follow the separate [illustrated technical SEO & AEO setup](/integrations/technical-seo/wordpress) to install the RankAI script.
***
*Last reviewed: October 12, 2026.*
This documentation is built and hosted on [Mintlify](https://mintlify.com), a developer documentation platform.
*Scroll to **Application Passwords**, enter a name (e.g. “RankAI”), then click **Add Application Password**. Copy the generated password once it appears.*
Paste this application password into RankAI in Step 3.
Note
Some security plugins turn application passwords off by default. If you don’t see the Application Passwords section, check your security or login plugin settings and enable application passwords for your user (or temporarily disable the restriction) so you can create one.
## Step 3: Connect your credentials in RankAI
Back in your RankAI project, open the WordPress integration screen. Enter your WordPress username and the application password you created, then click **Connect**.
Connect credentials
Enter your WordPress username and application password.
**Username:** WordPress username.
**Application Password:** Application password.
**Username:** Paste the WordPress username you copied in Step 2.1.
**Application Password:** Paste the application password WordPress generated in Step 2.2 (the long string with spaces—you can paste it with or without spaces; RankAI will accept either).
Click **Connect**. RankAI will verify the credentials and connect your site. Once connected, you can manage publishing and content settings from your RankAI dashboard.
## FAQ
### What if the connection fails?
Double-check that (1) your site URL is correct and reachable, (2) your username matches your WordPress login, and (3) you’re using the application password (not your normal WordPress password).
### I don’t see the Application Passwords section in WordPress. What do I do?
Some security plugins turn application passwords off by default. Check your security or login plugin settings and enable application passwords for your user (or temporarily disable the restriction) so you can create one.
### Where can I get more support?
Contact your RankAI account team or check the help section in your dashboard.
## Install the technical SEO & AEO script
The CMS connection above handles articles. Follow the separate [illustrated technical SEO & AEO setup](/integrations/technical-seo/wordpress) to install the RankAI script.
***
*Last reviewed: October 12, 2026.*
This documentation is built and hosted on [Mintlify](https://mintlify.com), a developer documentation platform.