> ## Documentation Index
> Fetch the complete documentation index at: https://docs.rankai.ai/llms.txt
> Use this file to discover all available pages before exploring further.
# Shopify blog integration guide
> Connect your Shopify store to RankAI in four steps: get your Admin Portal URL, create an app with Client ID and Secret, connect your credentials, and select your blog and author.
This guide walks you through connecting your Shopify store to RankAI so we can publish and manage your SEO and AEO blog content. You’ll need access to your Shopify Admin portal and your RankAI dashboard.
## Where to start in RankAI
In your RankAI project, open **Settings** in the sidebar. Under **Site Integration**, find **Connected CMS** and click **Configure**.
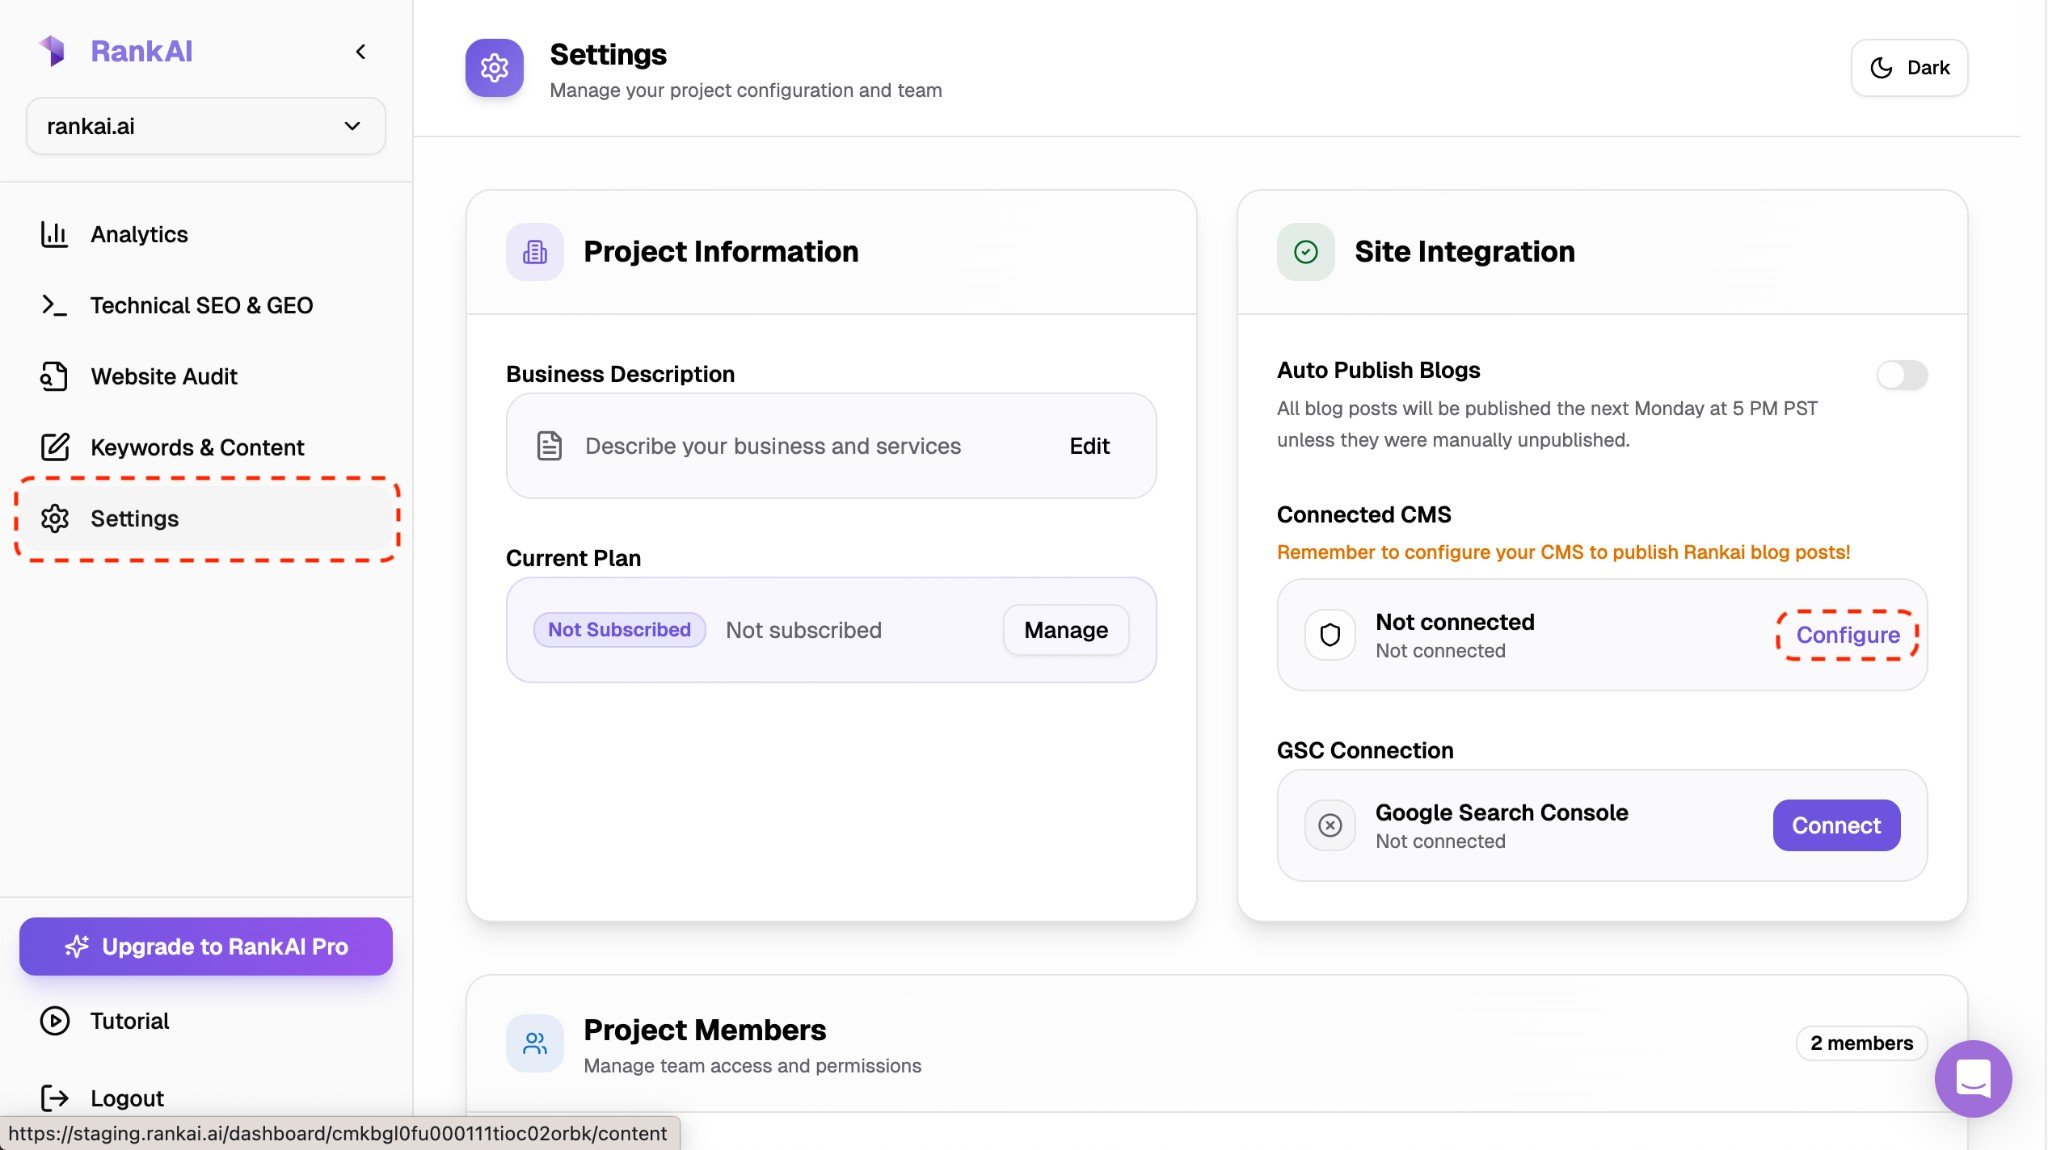 *Settings → Site Integration → Configure under Connected CMS.*
On the next screen, you’ll see **All Integrations**. Click the **Shopify** card to continue.
*Settings → Site Integration → Configure under Connected CMS.*
On the next screen, you’ll see **All Integrations**. Click the **Shopify** card to continue.
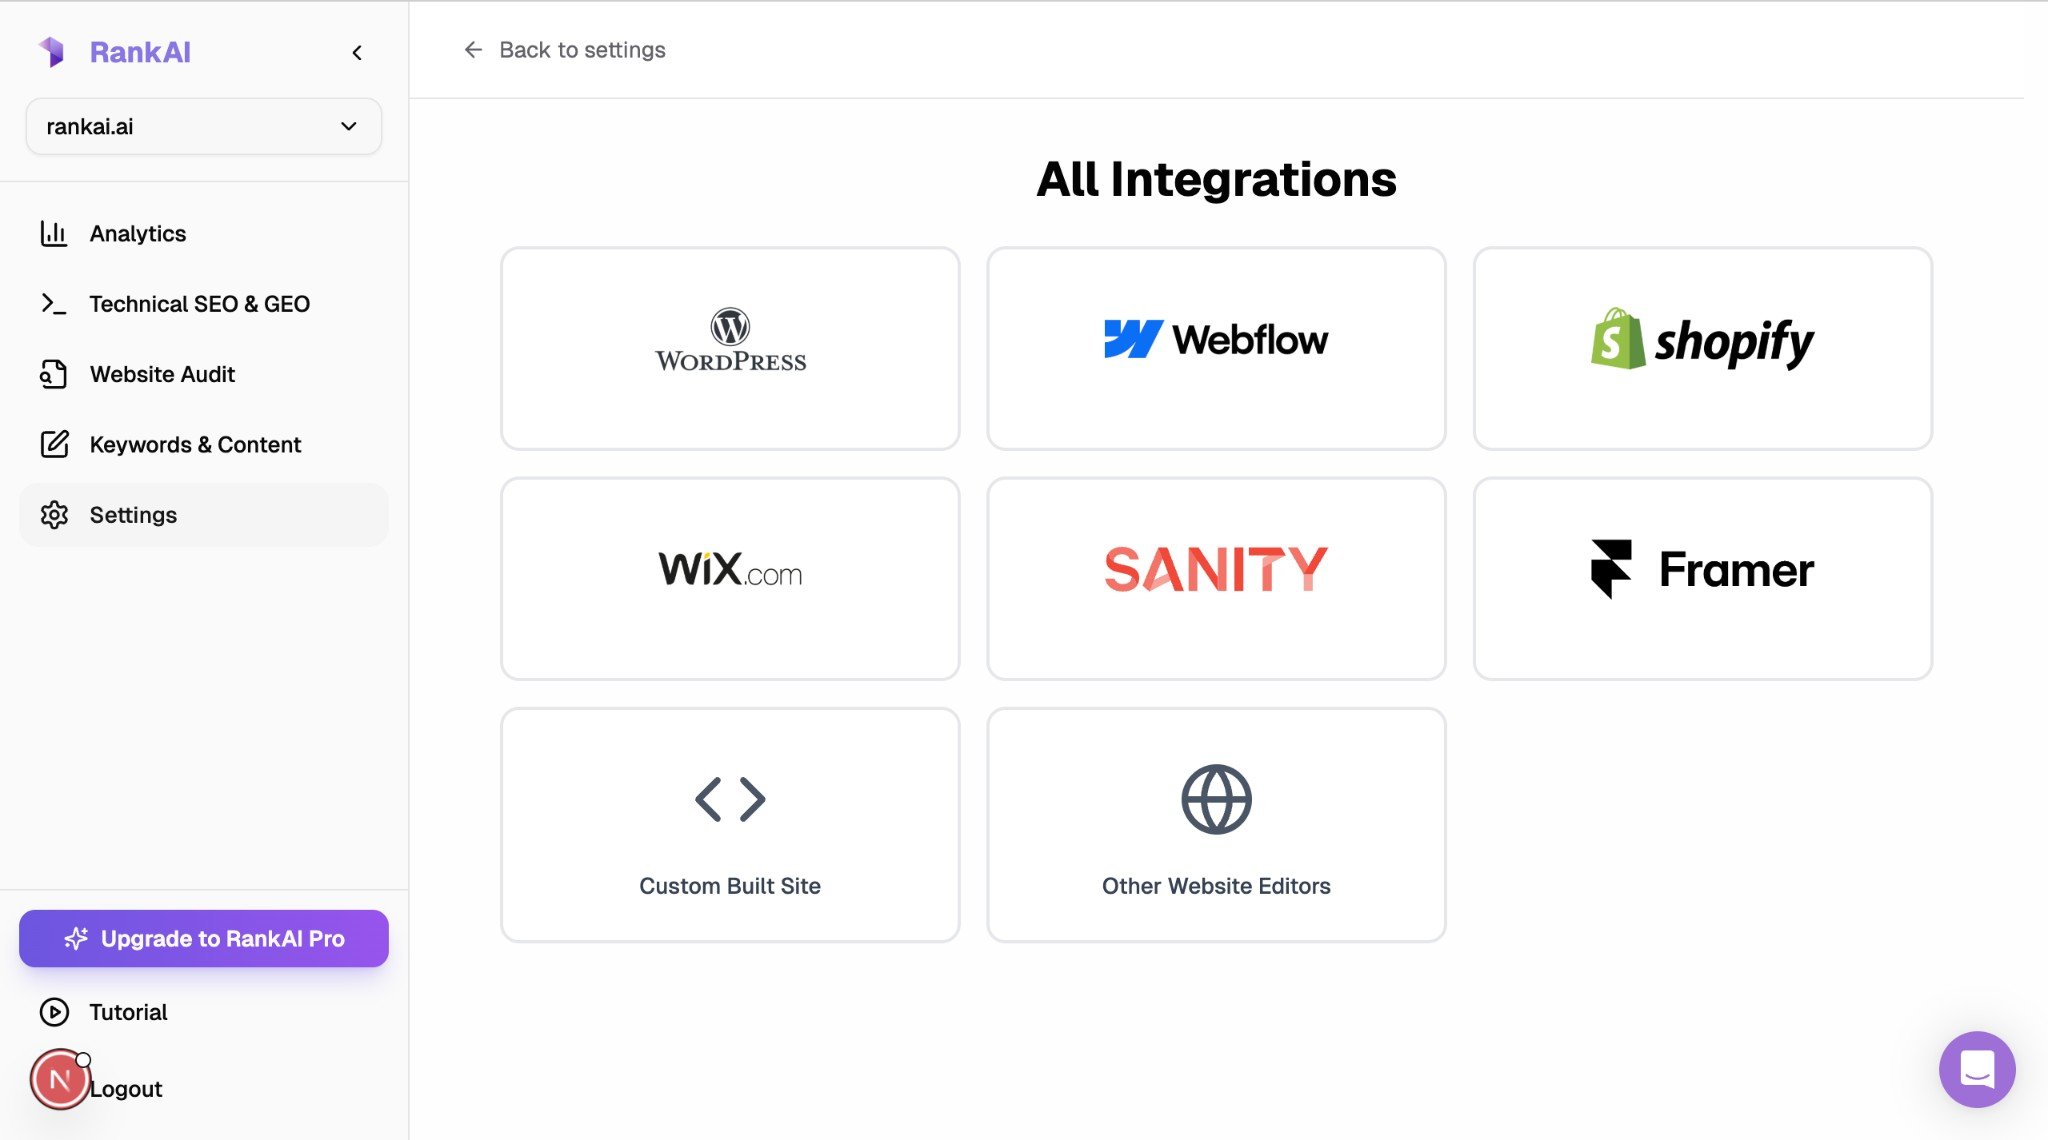 *Select Shopify from the integrations list.*
## Step 1: Get Shopify Store Name
Go to your Shopify Admin portal and sign in. Copy the Shopify Store Name from your browser’s address bar (e.g. `your-store-name.myshopify.com`) or `admin.shopify.com/store/your-store-name`. You’ll paste this into RankAI in Step 3.
*Select Shopify from the integrations list.*
## Step 1: Get Shopify Store Name
Go to your Shopify Admin portal and sign in. Copy the Shopify Store Name from your browser’s address bar (e.g. `your-store-name.myshopify.com`) or `admin.shopify.com/store/your-store-name`. You’ll paste this into RankAI in Step 3.
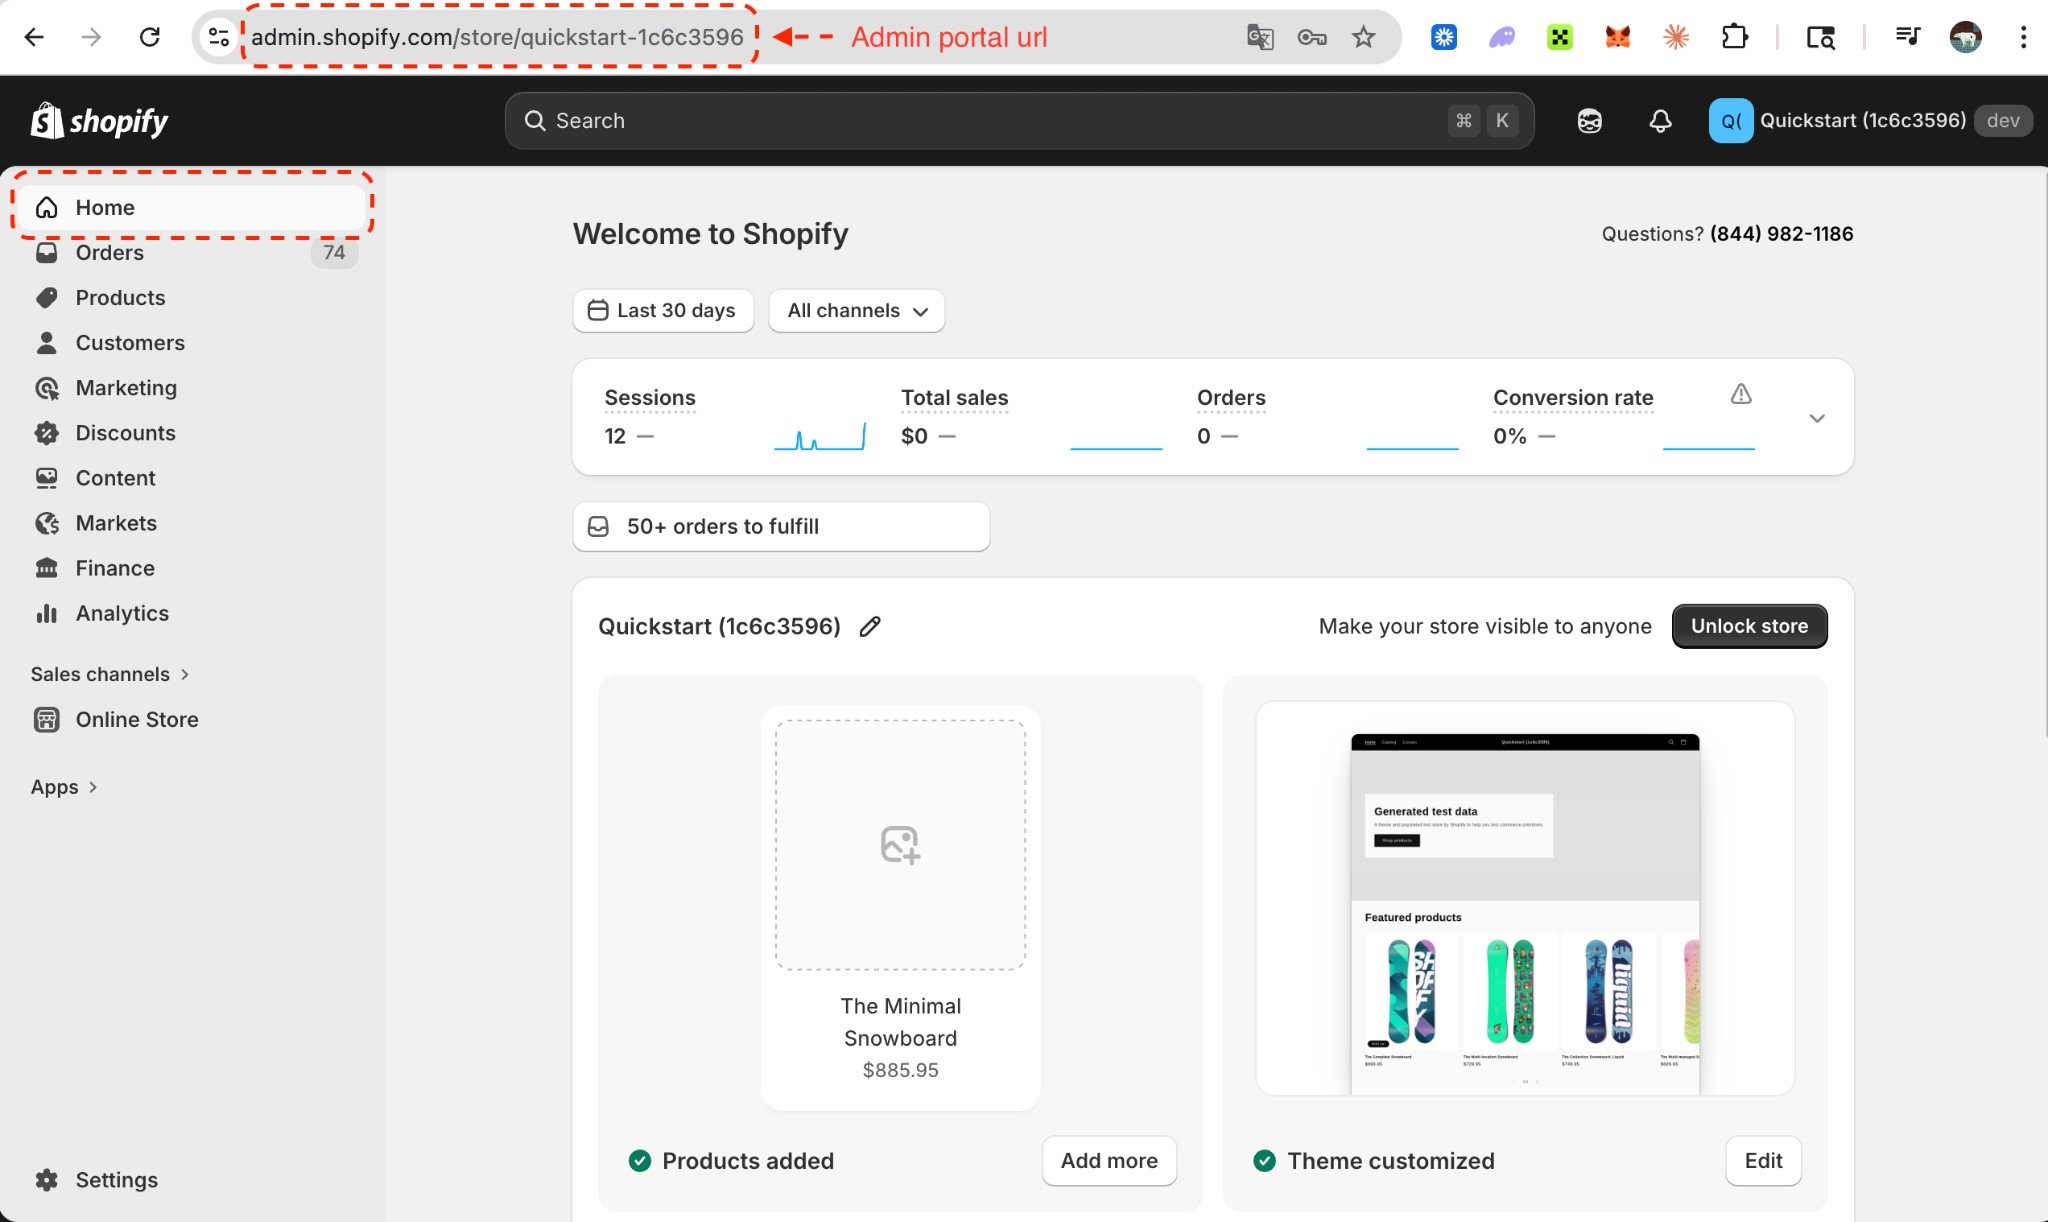 *Copy the full URL from the address bar—this is your Shopify Admin Portal URL.*
## Step 2: Create Client ID and Secret
RankAI connects to Shopify using a **Client ID and Secret**. You’ll create a custom app in Shopify Dev Dashboard, configure the required scopes, install it, and then copy the ID and Secret.
### 2.1 Go to Dev Dashboard and sign in with your Shopify Partner account
If you don't have a Partner account, create one at the Dev Dashboard (it's free). In your Shopify Dev Dashboard, click on the **Apps** section from the sidebar and then click **Create app** button.
*Copy the full URL from the address bar—this is your Shopify Admin Portal URL.*
## Step 2: Create Client ID and Secret
RankAI connects to Shopify using a **Client ID and Secret**. You’ll create a custom app in Shopify Dev Dashboard, configure the required scopes, install it, and then copy the ID and Secret.
### 2.1 Go to Dev Dashboard and sign in with your Shopify Partner account
If you don't have a Partner account, create one at the Dev Dashboard (it's free). In your Shopify Dev Dashboard, click on the **Apps** section from the sidebar and then click **Create app** button.
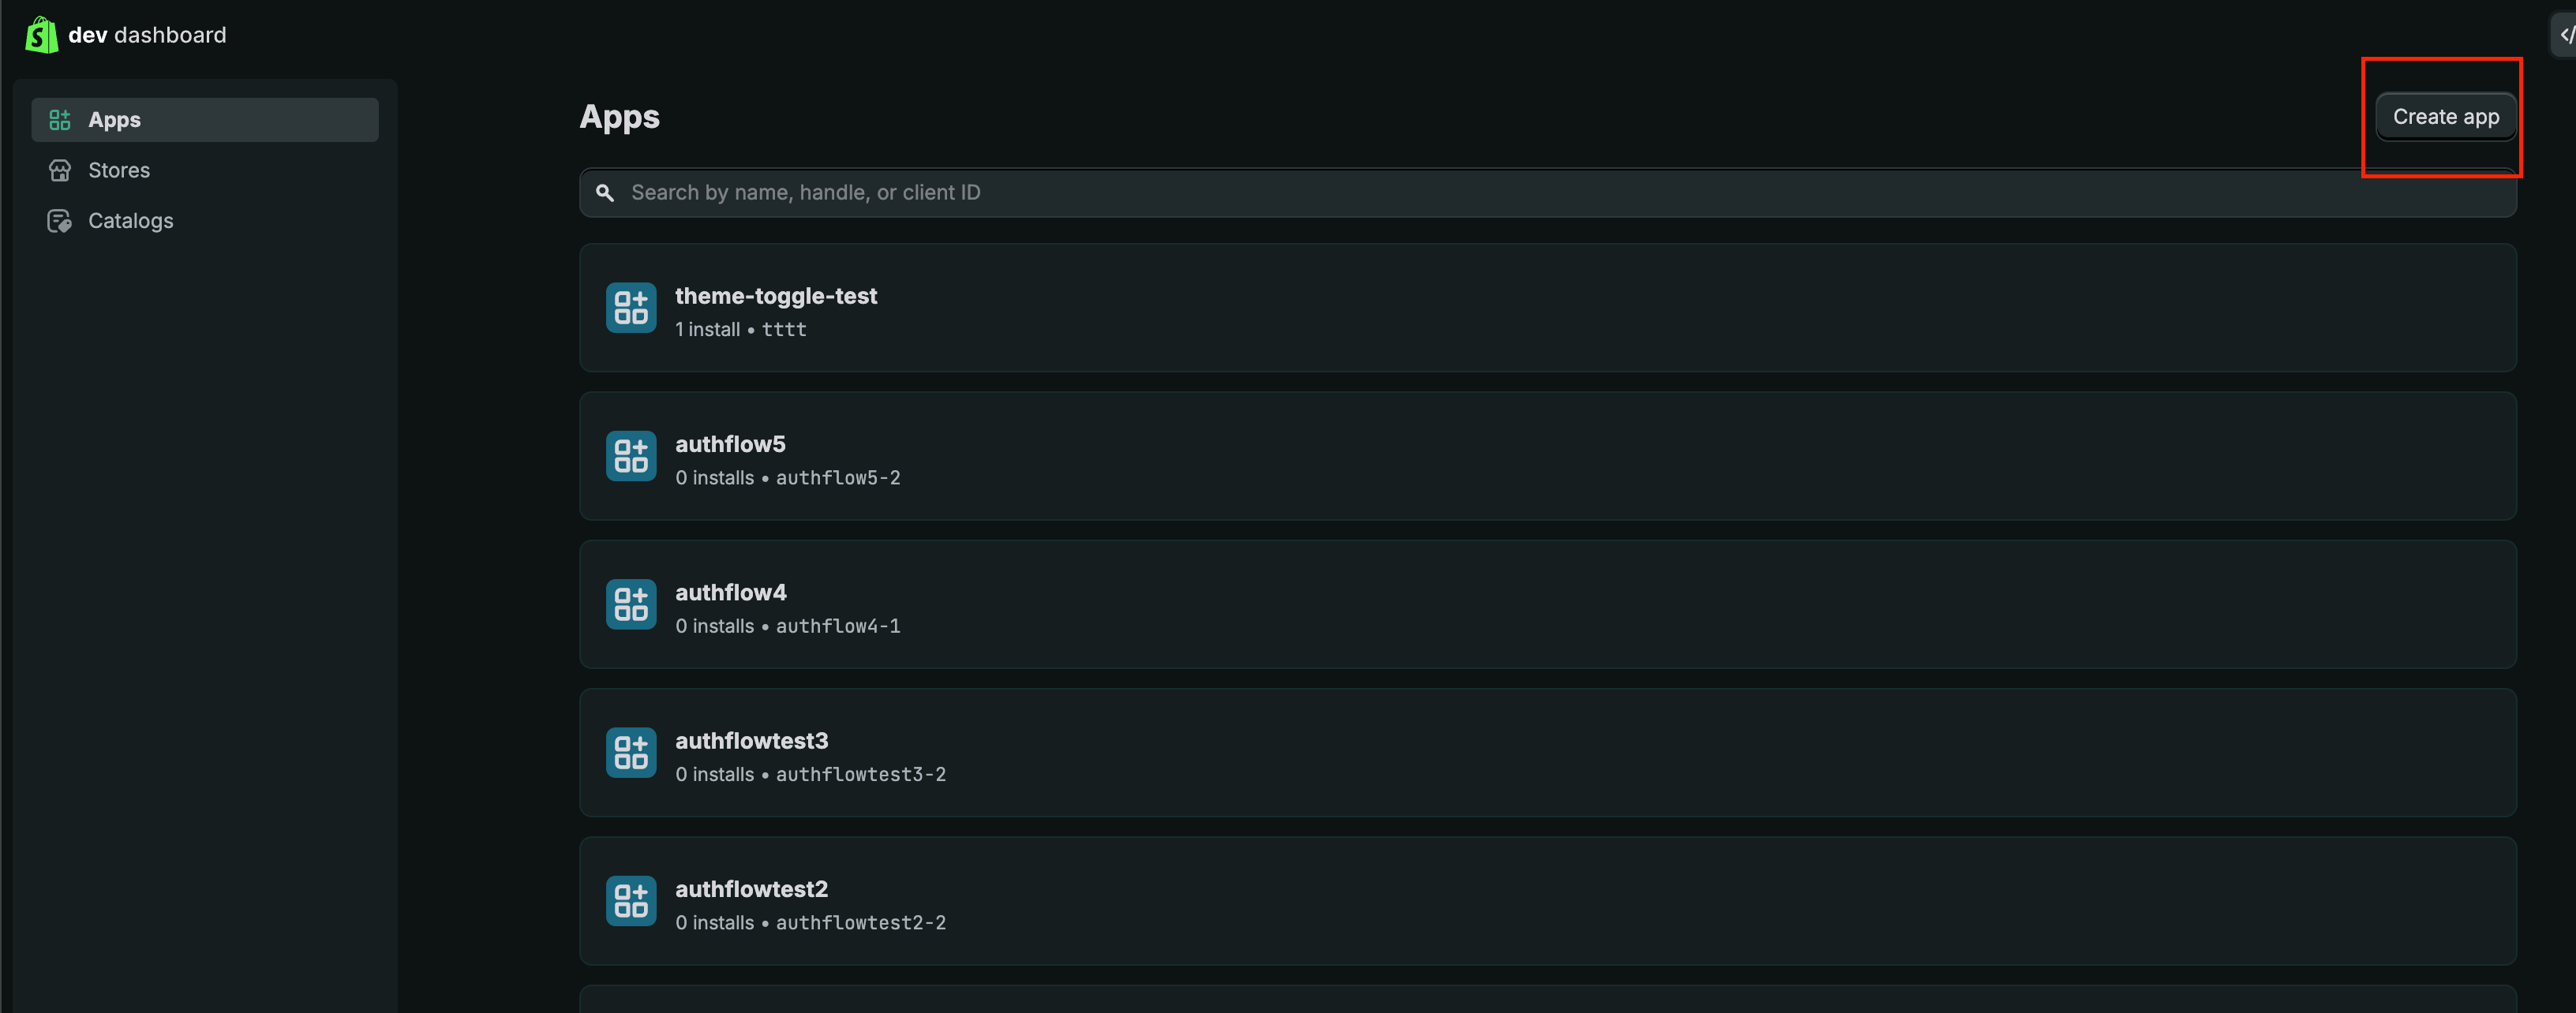 *Shopify Dev Dashboard → Apps → Create app button.*
### 2.2 Create an app
On the App page, enter the app name **RankAI** (or any name you prefer). Click **Create**.
*Shopify Dev Dashboard → Apps → Create app button.*
### 2.2 Create an app
On the App page, enter the app name **RankAI** (or any name you prefer). Click **Create**.
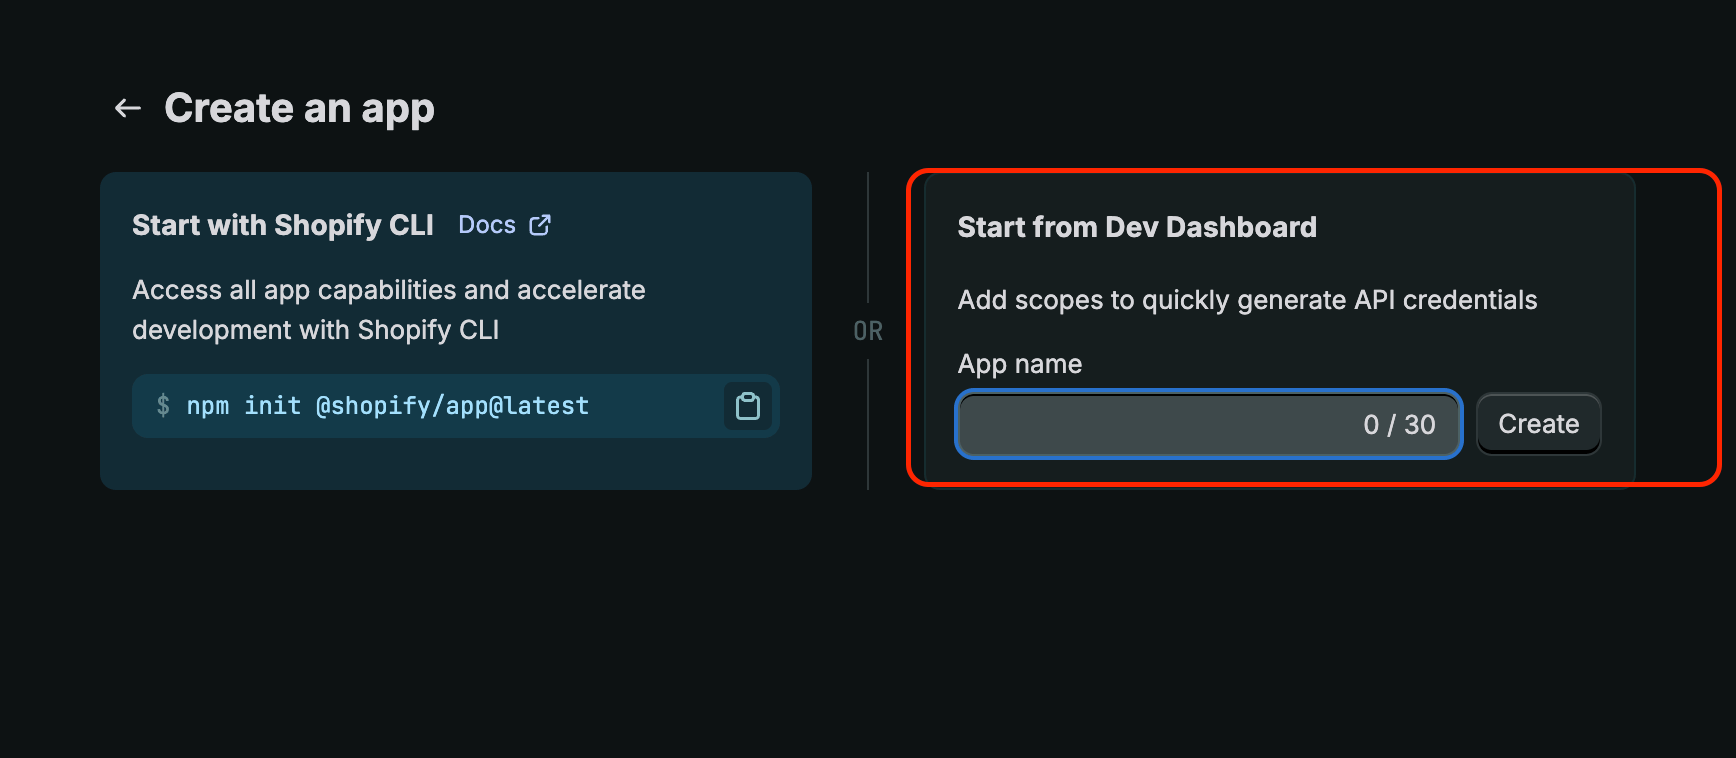 *Click Create on the App name page.*
### 2.3 Configure Scopes and Release
You'll be prompted to create a version. Scroll down to the Access section and click **Select Scopes** button. Add the following scopes:
* **Store content**: `read_content`, `write_content`
* **Themes**: `read_themes`, `write_themes`
*Click Create on the App name page.*
### 2.3 Configure Scopes and Release
You'll be prompted to create a version. Scroll down to the Access section and click **Select Scopes** button. Add the following scopes:
* **Store content**: `read_content`, `write_content`
* **Themes**: `read_themes`, `write_themes`
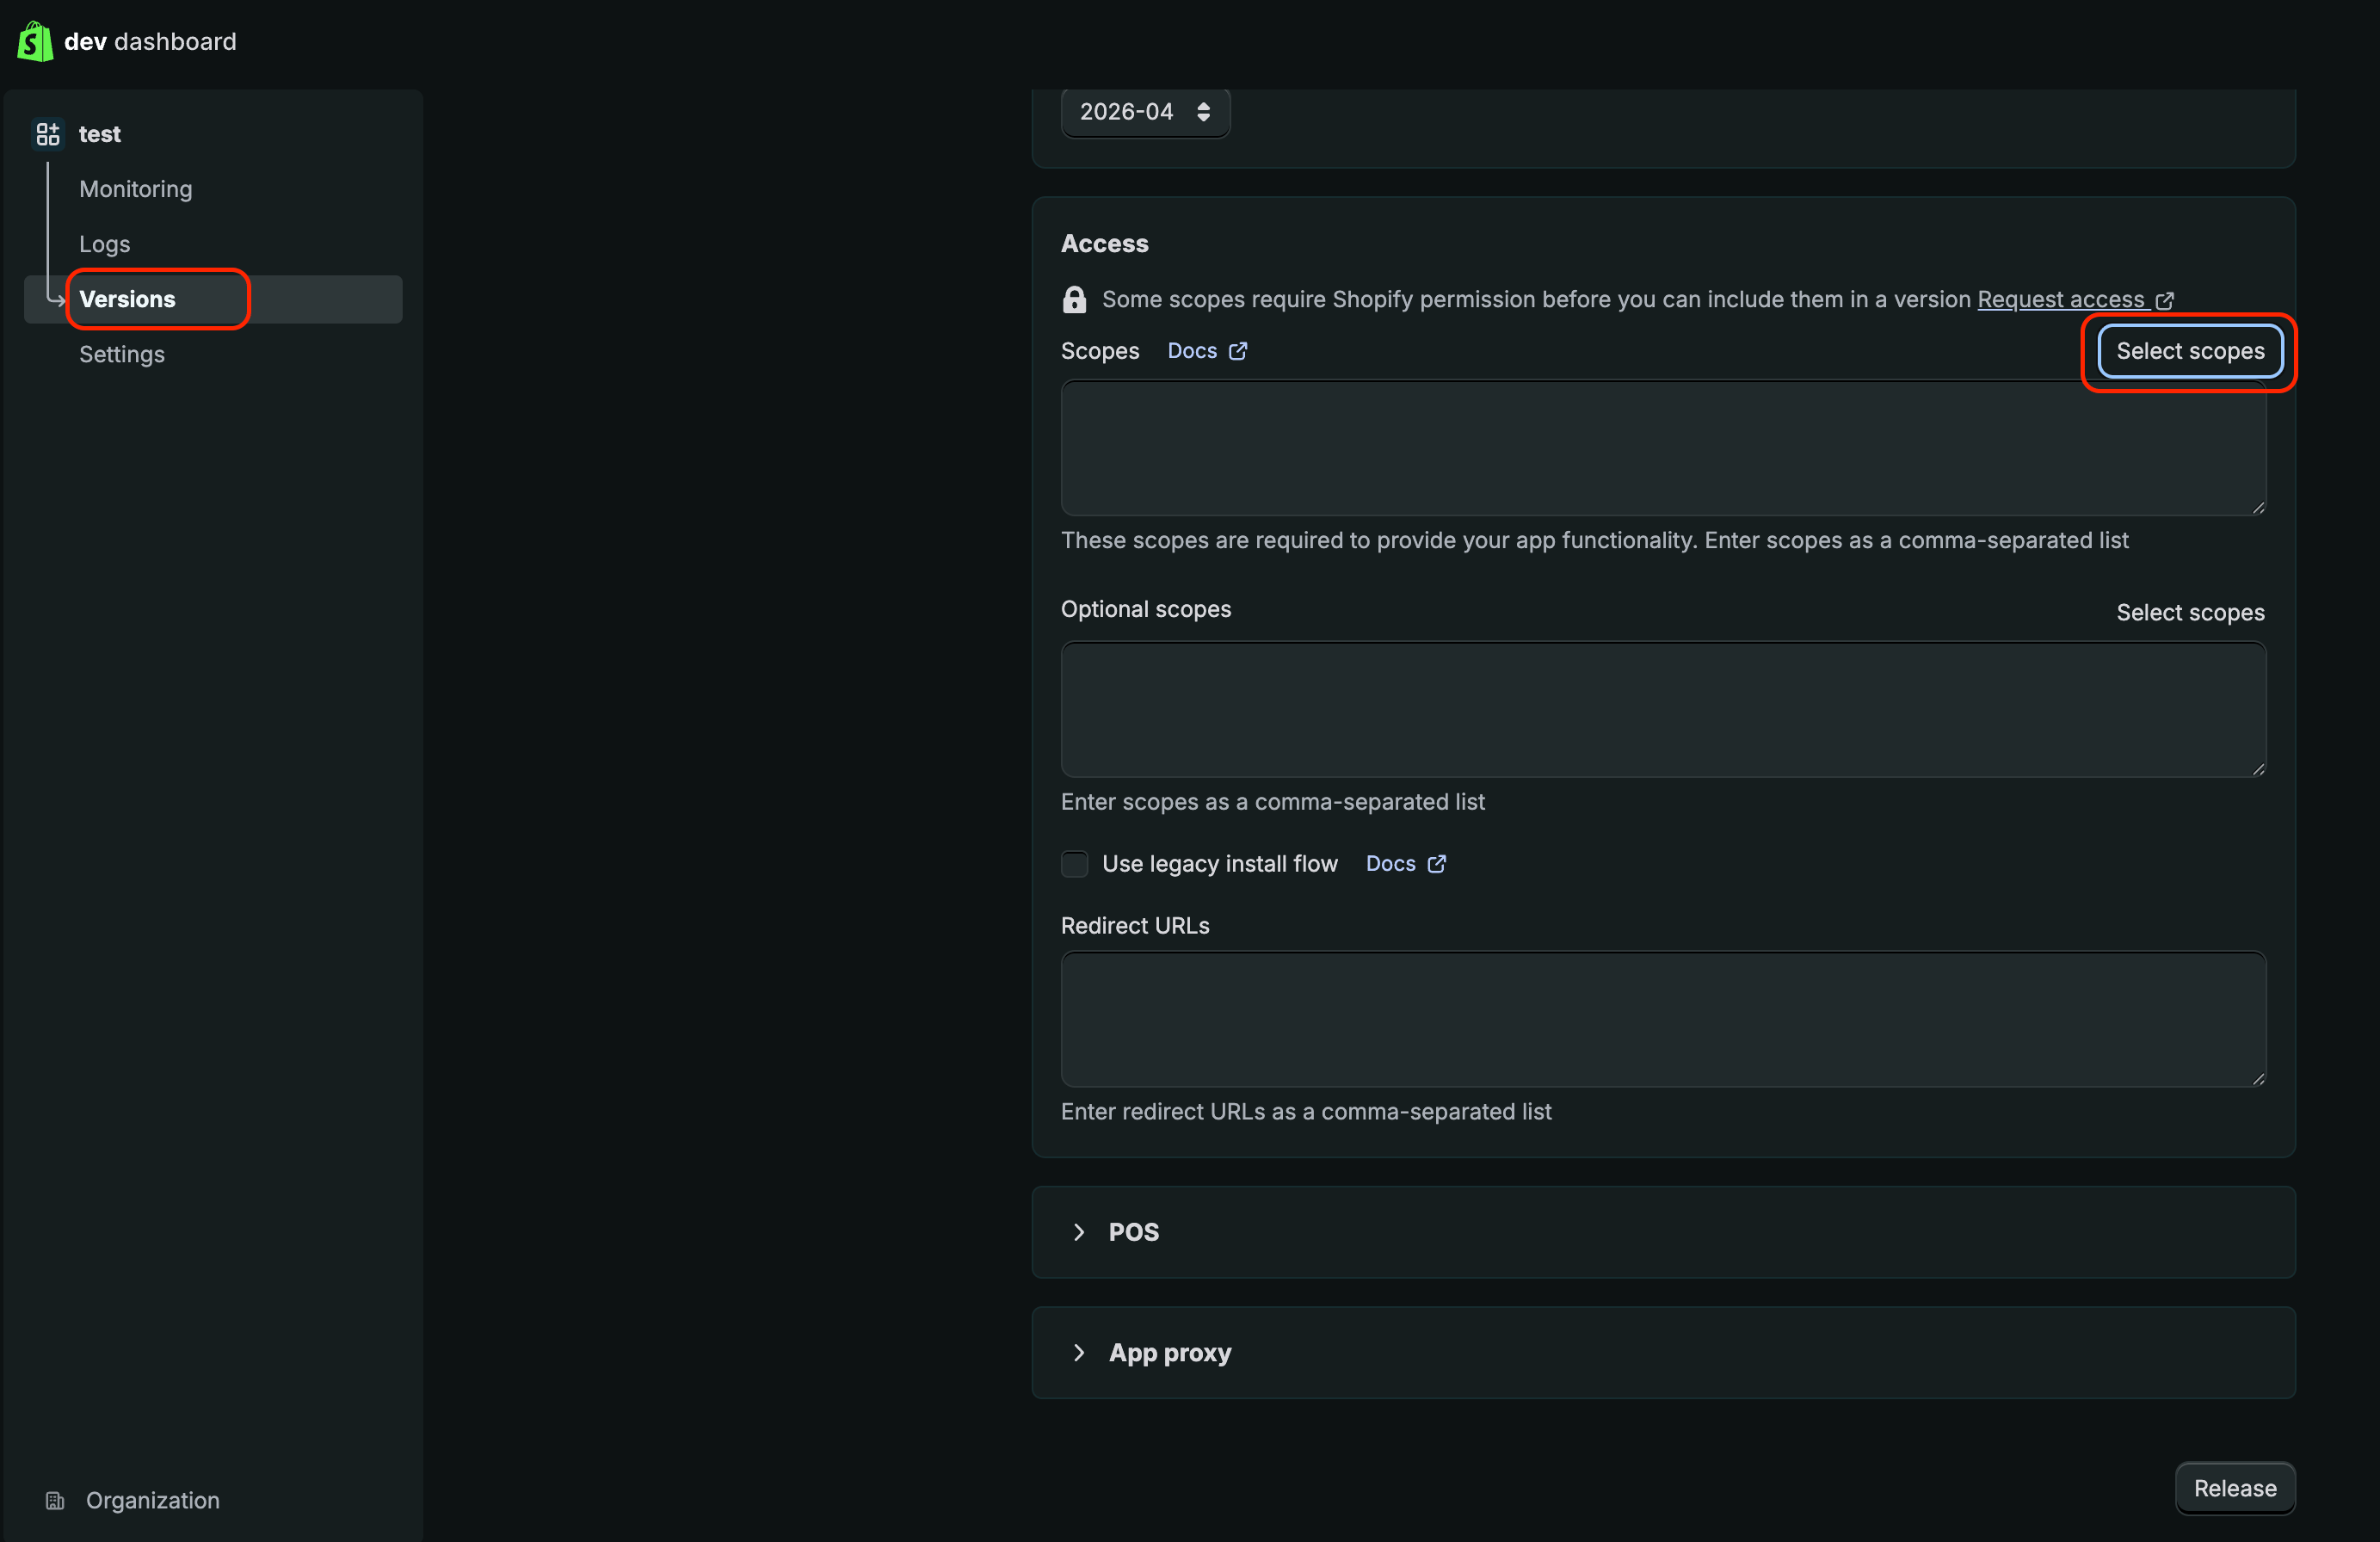 *Add the required scopes.*
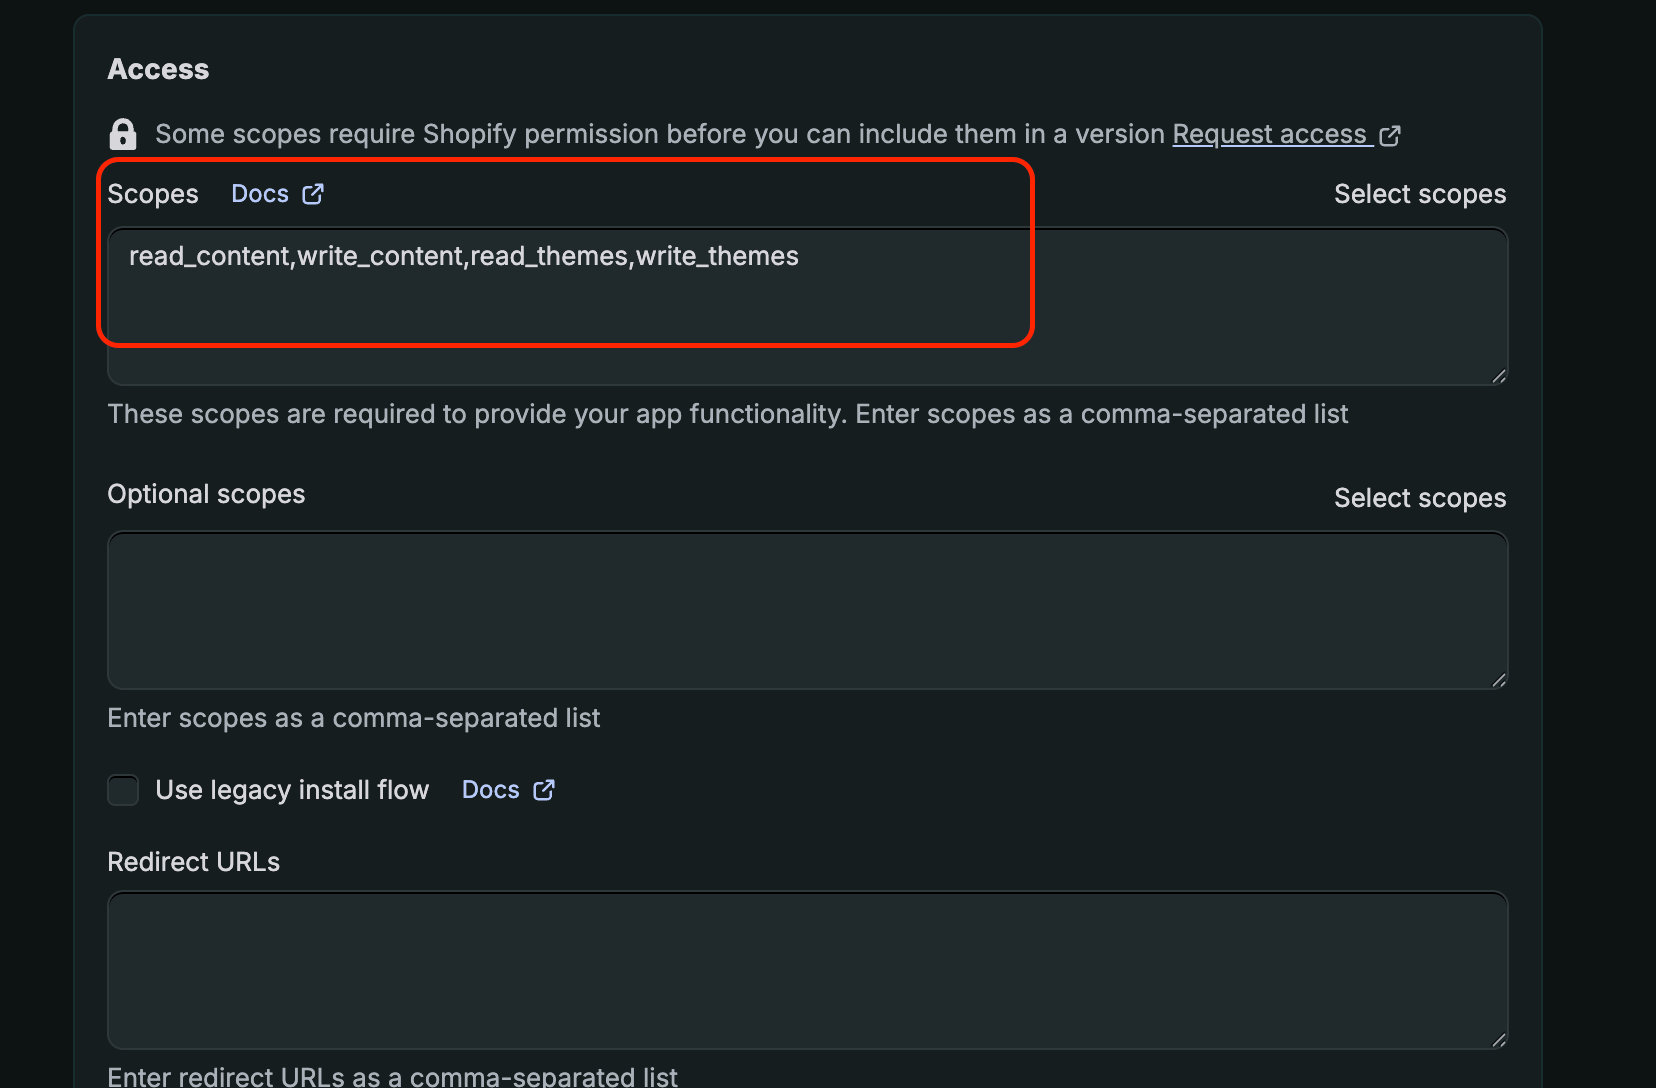 *Select the required scopes.*
Click **Release** button to create the version and optionally give the version a name.
*Select the required scopes.*
Click **Release** button to create the version and optionally give the version a name.
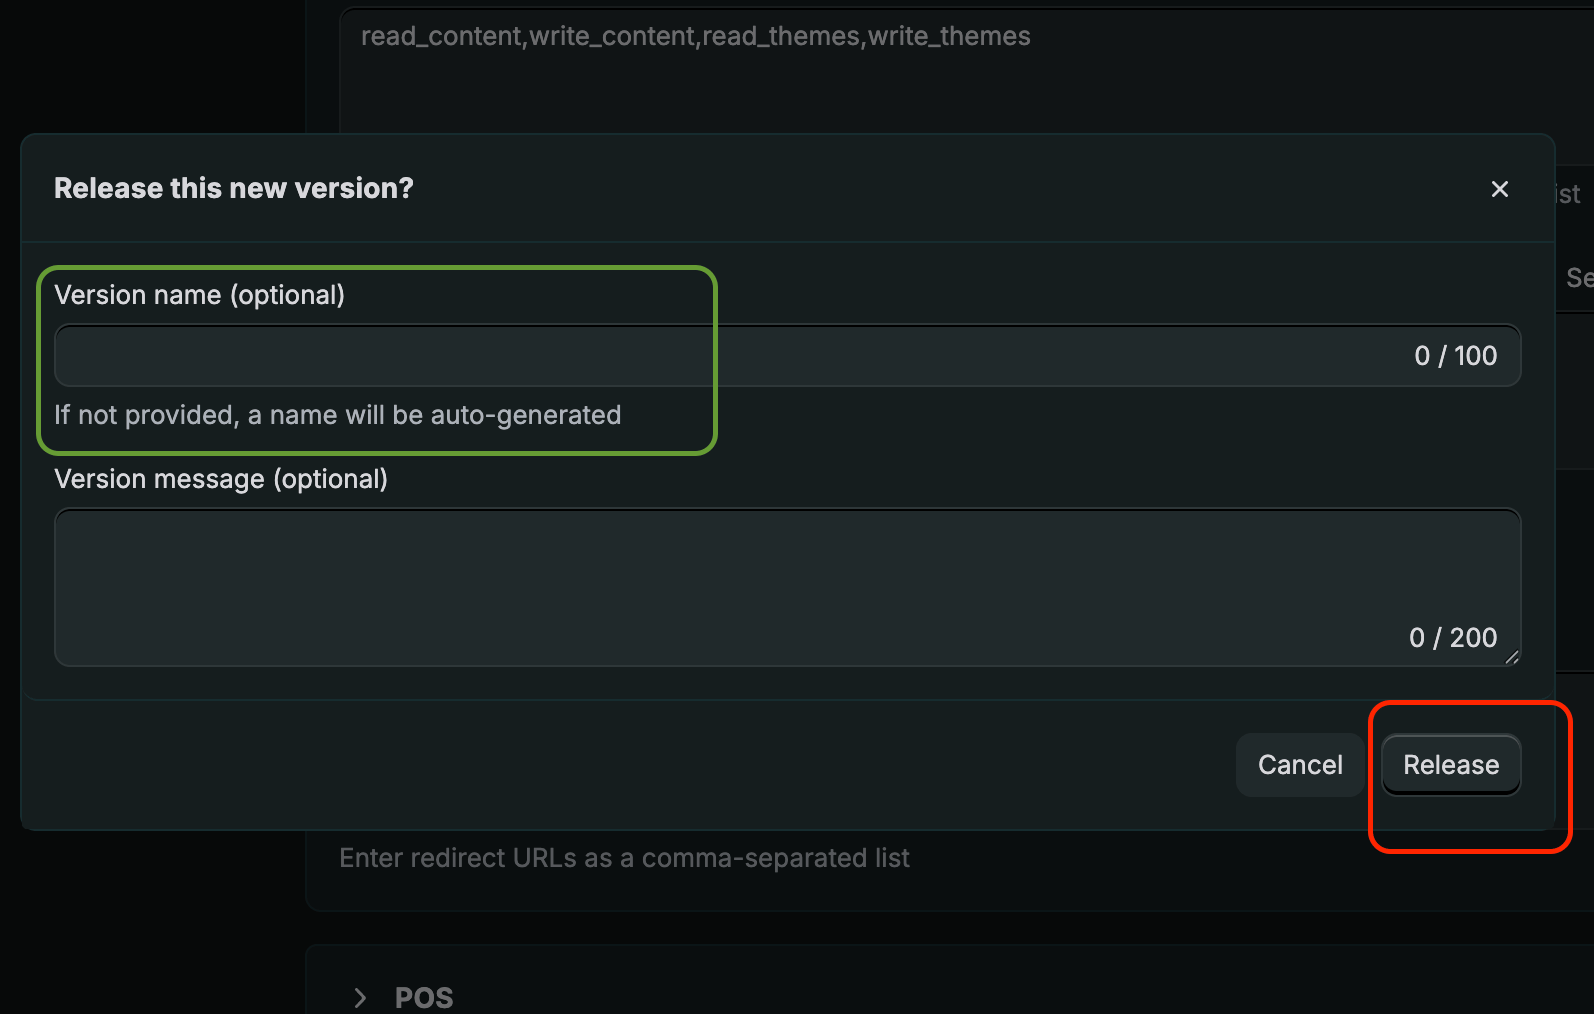 *Give a name -> Click Release*
Click **Release** button again to release the version.
### 2.4 Install the app in your store
Go to Home tab under your app in the left sidebar and click Install app and click Install again on the next page. Make sure you select the current store to install the app.
*Give a name -> Click Release*
Click **Release** button again to release the version.
### 2.4 Install the app in your store
Go to Home tab under your app in the left sidebar and click Install app and click Install again on the next page. Make sure you select the current store to install the app.
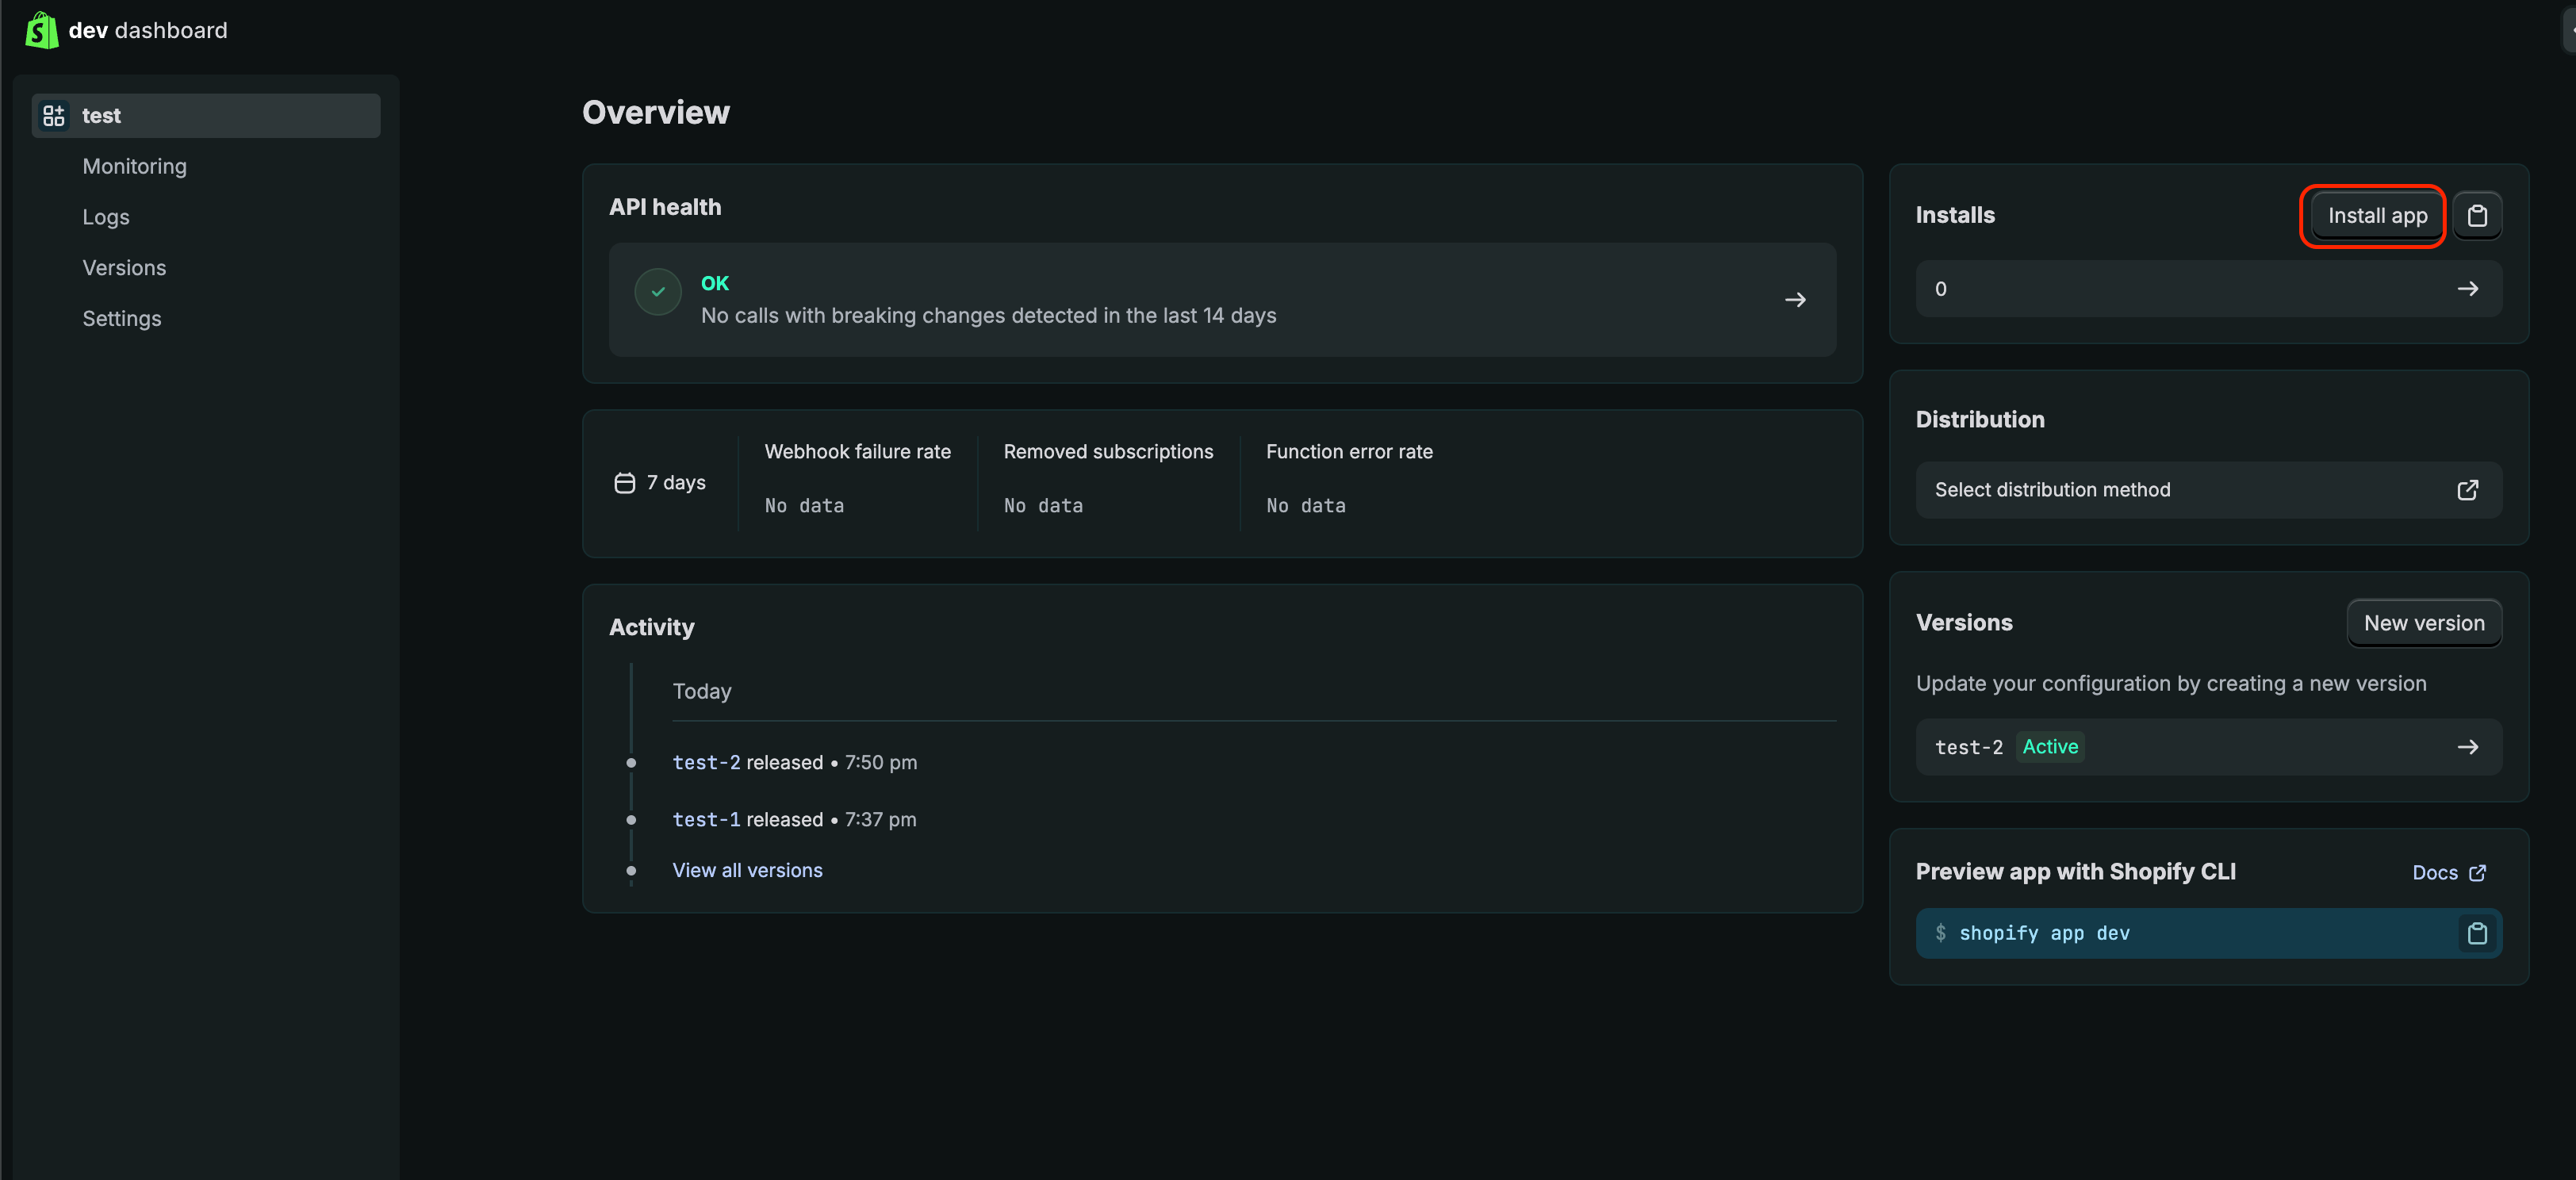 *Home -> Click Install app*
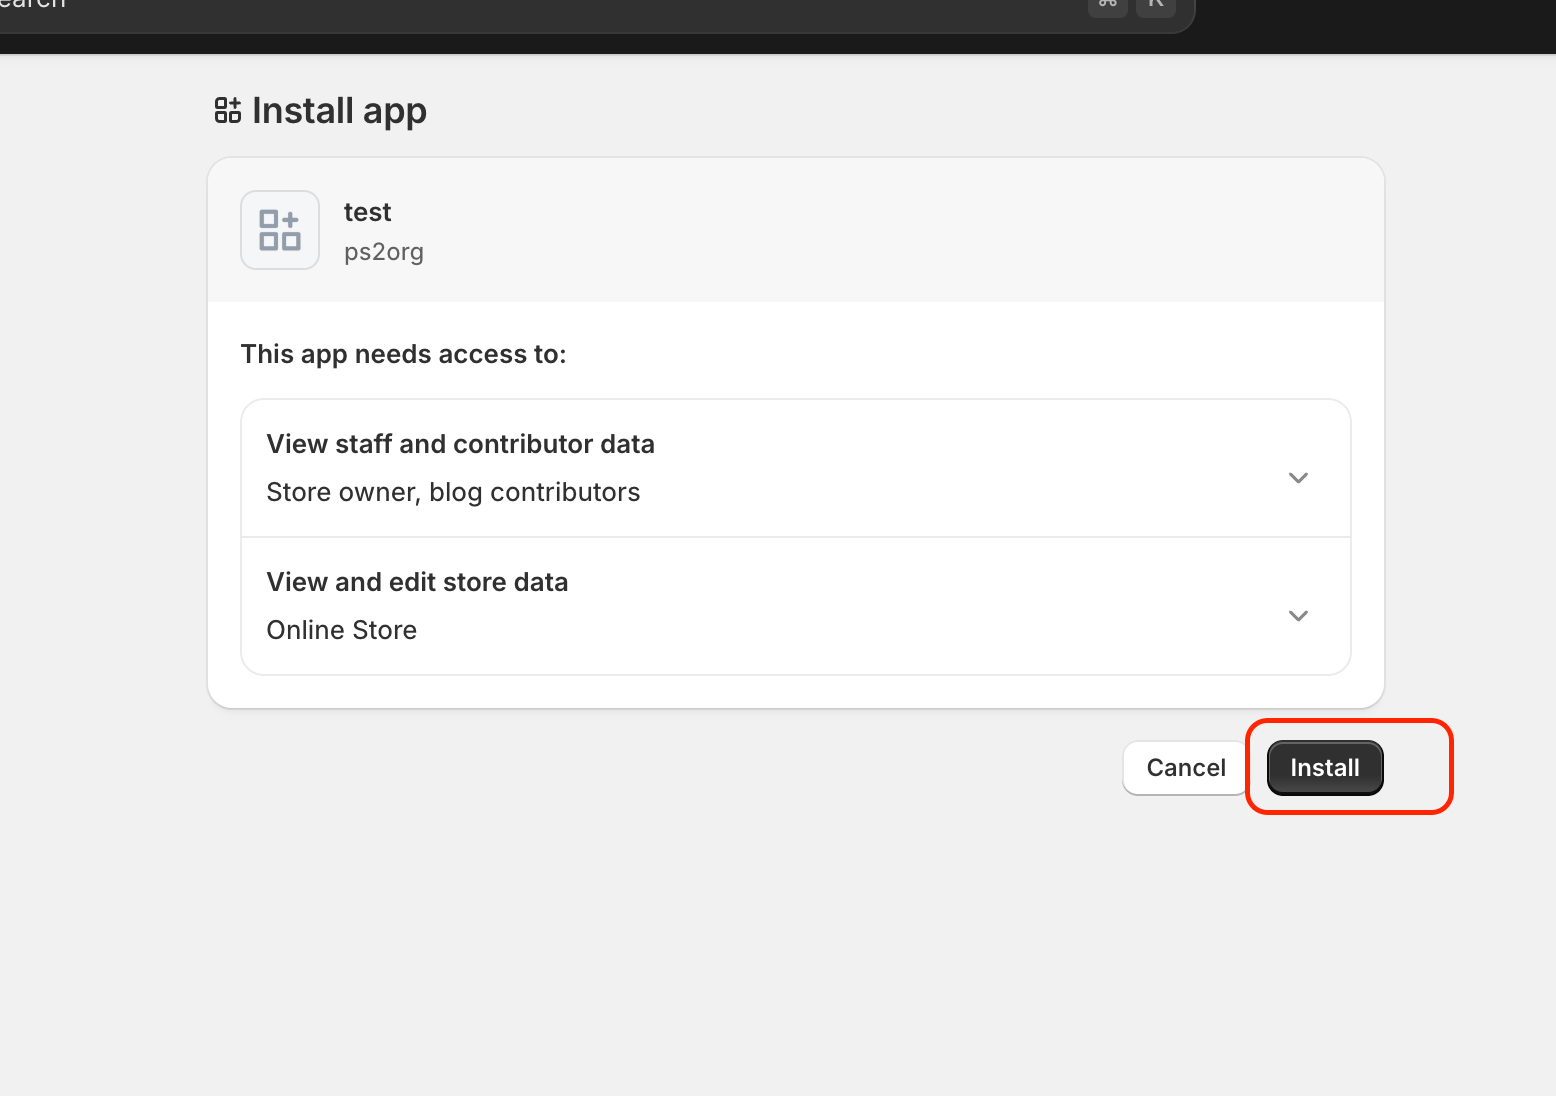 *Install the app in your store (on admin.shopify.com)*
### 2.5 Copy the Client ID and Secret
Once installed, go back to dev dashboard and click on your app. Go to Settings tab under your app in the left sidebar
*Install the app in your store (on admin.shopify.com)*
### 2.5 Copy the Client ID and Secret
Once installed, go back to dev dashboard and click on your app. Go to Settings tab under your app in the left sidebar
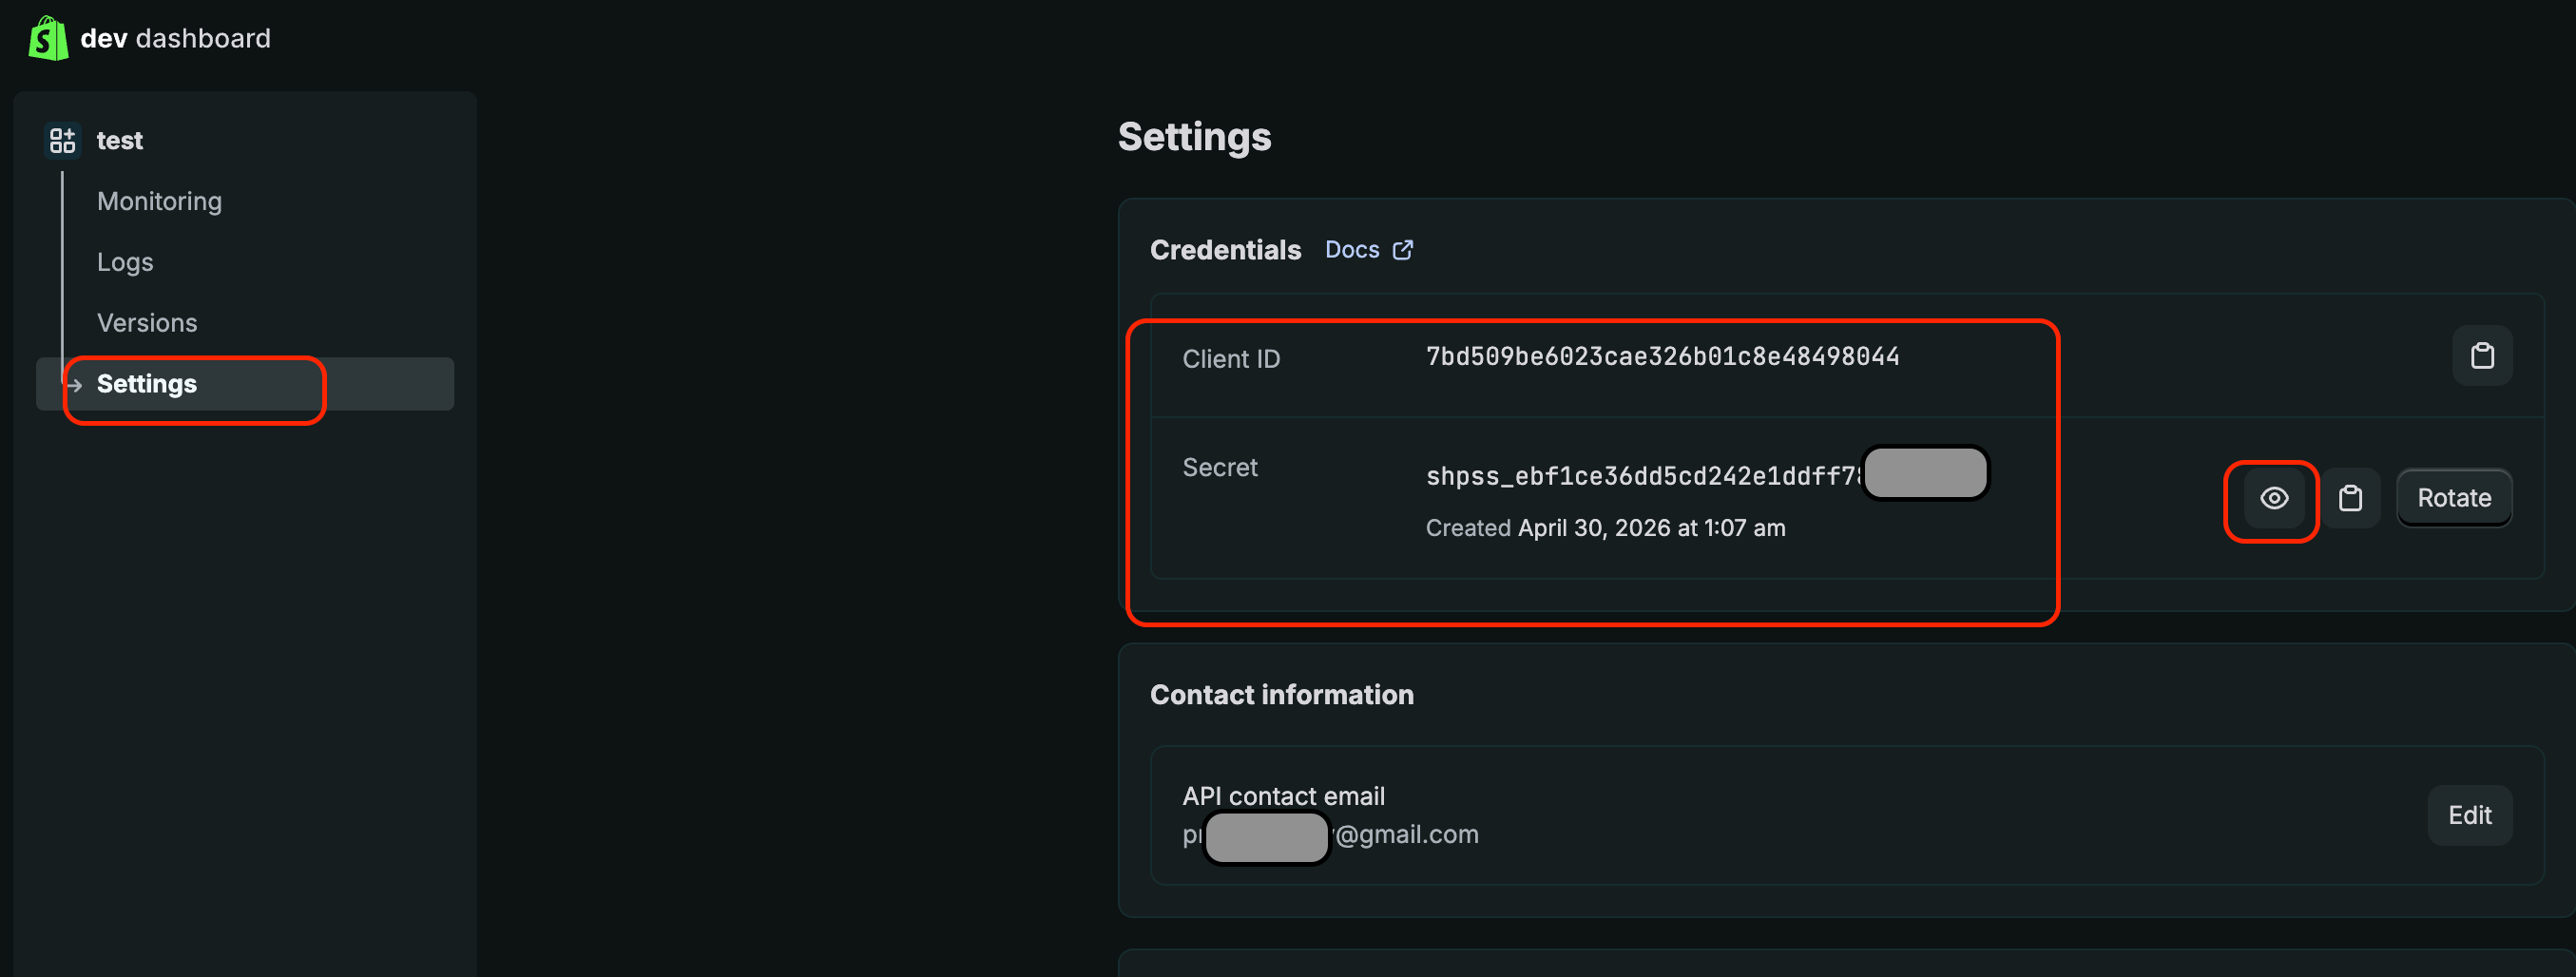 *Settings -> Credentials -> Copy the Client ID and show and copy the Secret as well!*
Important
Keep your Client ID and Secret safe.
## Step 3: Connect credentials
Back in your RankAI project, open the Shopify integration screen. Enter your Shopify Store Name (from Step 1) and your Client ID and Secret (from Step 2.5), then click **Connect**.
Connect credentials
Enter your Shopify Store Name and Client ID and Secret.
**Shopify Store Name:** Your store name.
**Client ID:** Your app’s client ID.
**Client Secret:** Your app’s client secret.
**Shopify Store Name:** Paste the Shopify Store Name you copied from your browser in Step 1 (e.g. `admin.shopify.com/store/your-store-name`).
**Client ID:** Paste the Client ID you copied in Step 2.5.
**Client Secret:** Paste the Client Secret you copied in Step 2.5.
Click **Connect**. RankAI will verify the credentials and connect your store. After connecting, you’ll see the **Select Shopify Blog** screen—complete Step 4 below to finish setup.
## Step 4: Select Shopify blog and save
On the **Select Shopify Blog** screen, choose which blog collection RankAI will publish to and the author name that will appear on your posts. Then save and confirm the status.
### 4.1 Choose blog collection and author name
Use the **Blog collection** dropdown to select the Shopify blog where you want RankAI to publish posts (e.g. “Knowledge”, “News”, or a custom blog). In **Author name (optional)**, enter the name that should appear as the author on published posts (e.g. “Rankai Admin” or your brand name).
*Settings -> Credentials -> Copy the Client ID and show and copy the Secret as well!*
Important
Keep your Client ID and Secret safe.
## Step 3: Connect credentials
Back in your RankAI project, open the Shopify integration screen. Enter your Shopify Store Name (from Step 1) and your Client ID and Secret (from Step 2.5), then click **Connect**.
Connect credentials
Enter your Shopify Store Name and Client ID and Secret.
**Shopify Store Name:** Your store name.
**Client ID:** Your app’s client ID.
**Client Secret:** Your app’s client secret.
**Shopify Store Name:** Paste the Shopify Store Name you copied from your browser in Step 1 (e.g. `admin.shopify.com/store/your-store-name`).
**Client ID:** Paste the Client ID you copied in Step 2.5.
**Client Secret:** Paste the Client Secret you copied in Step 2.5.
Click **Connect**. RankAI will verify the credentials and connect your store. After connecting, you’ll see the **Select Shopify Blog** screen—complete Step 4 below to finish setup.
## Step 4: Select Shopify blog and save
On the **Select Shopify Blog** screen, choose which blog collection RankAI will publish to and the author name that will appear on your posts. Then save and confirm the status.
### 4.1 Choose blog collection and author name
Use the **Blog collection** dropdown to select the Shopify blog where you want RankAI to publish posts (e.g. “Knowledge”, “News”, or a custom blog). In **Author name (optional)**, enter the name that should appear as the author on published posts (e.g. “Rankai Admin” or your brand name).
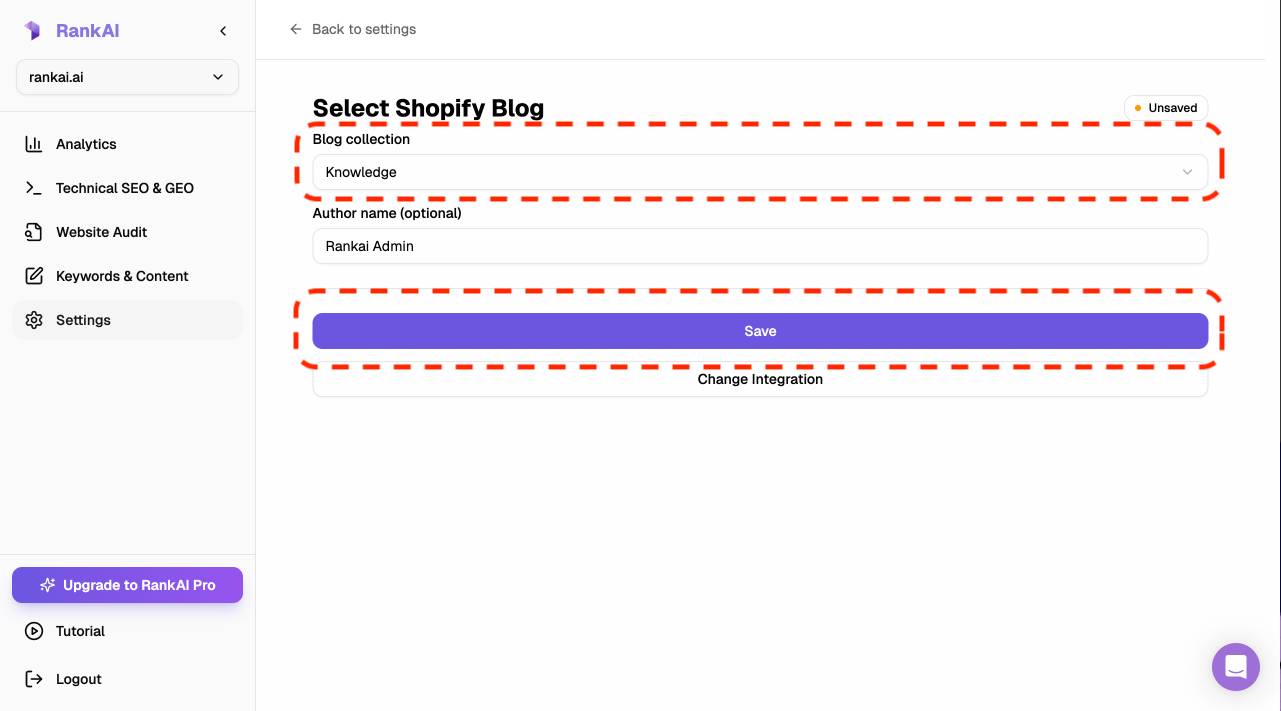 *Select your blog collection and author name. The status will show “Unsaved” until you save.*
### 4.2 Save and confirm
Click the **Save** button to store your choices. When saving succeeds, the status in the top right changes from **Unsaved** to **Saved** (with a green indicator). Only when you see **Saved** have you completed all steps and finished the Shopify integration setup.
*Select your blog collection and author name. The status will show “Unsaved” until you save.*
### 4.2 Save and confirm
Click the **Save** button to store your choices. When saving succeeds, the status in the top right changes from **Unsaved** to **Saved** (with a green indicator). Only when you see **Saved** have you completed all steps and finished the Shopify integration setup.
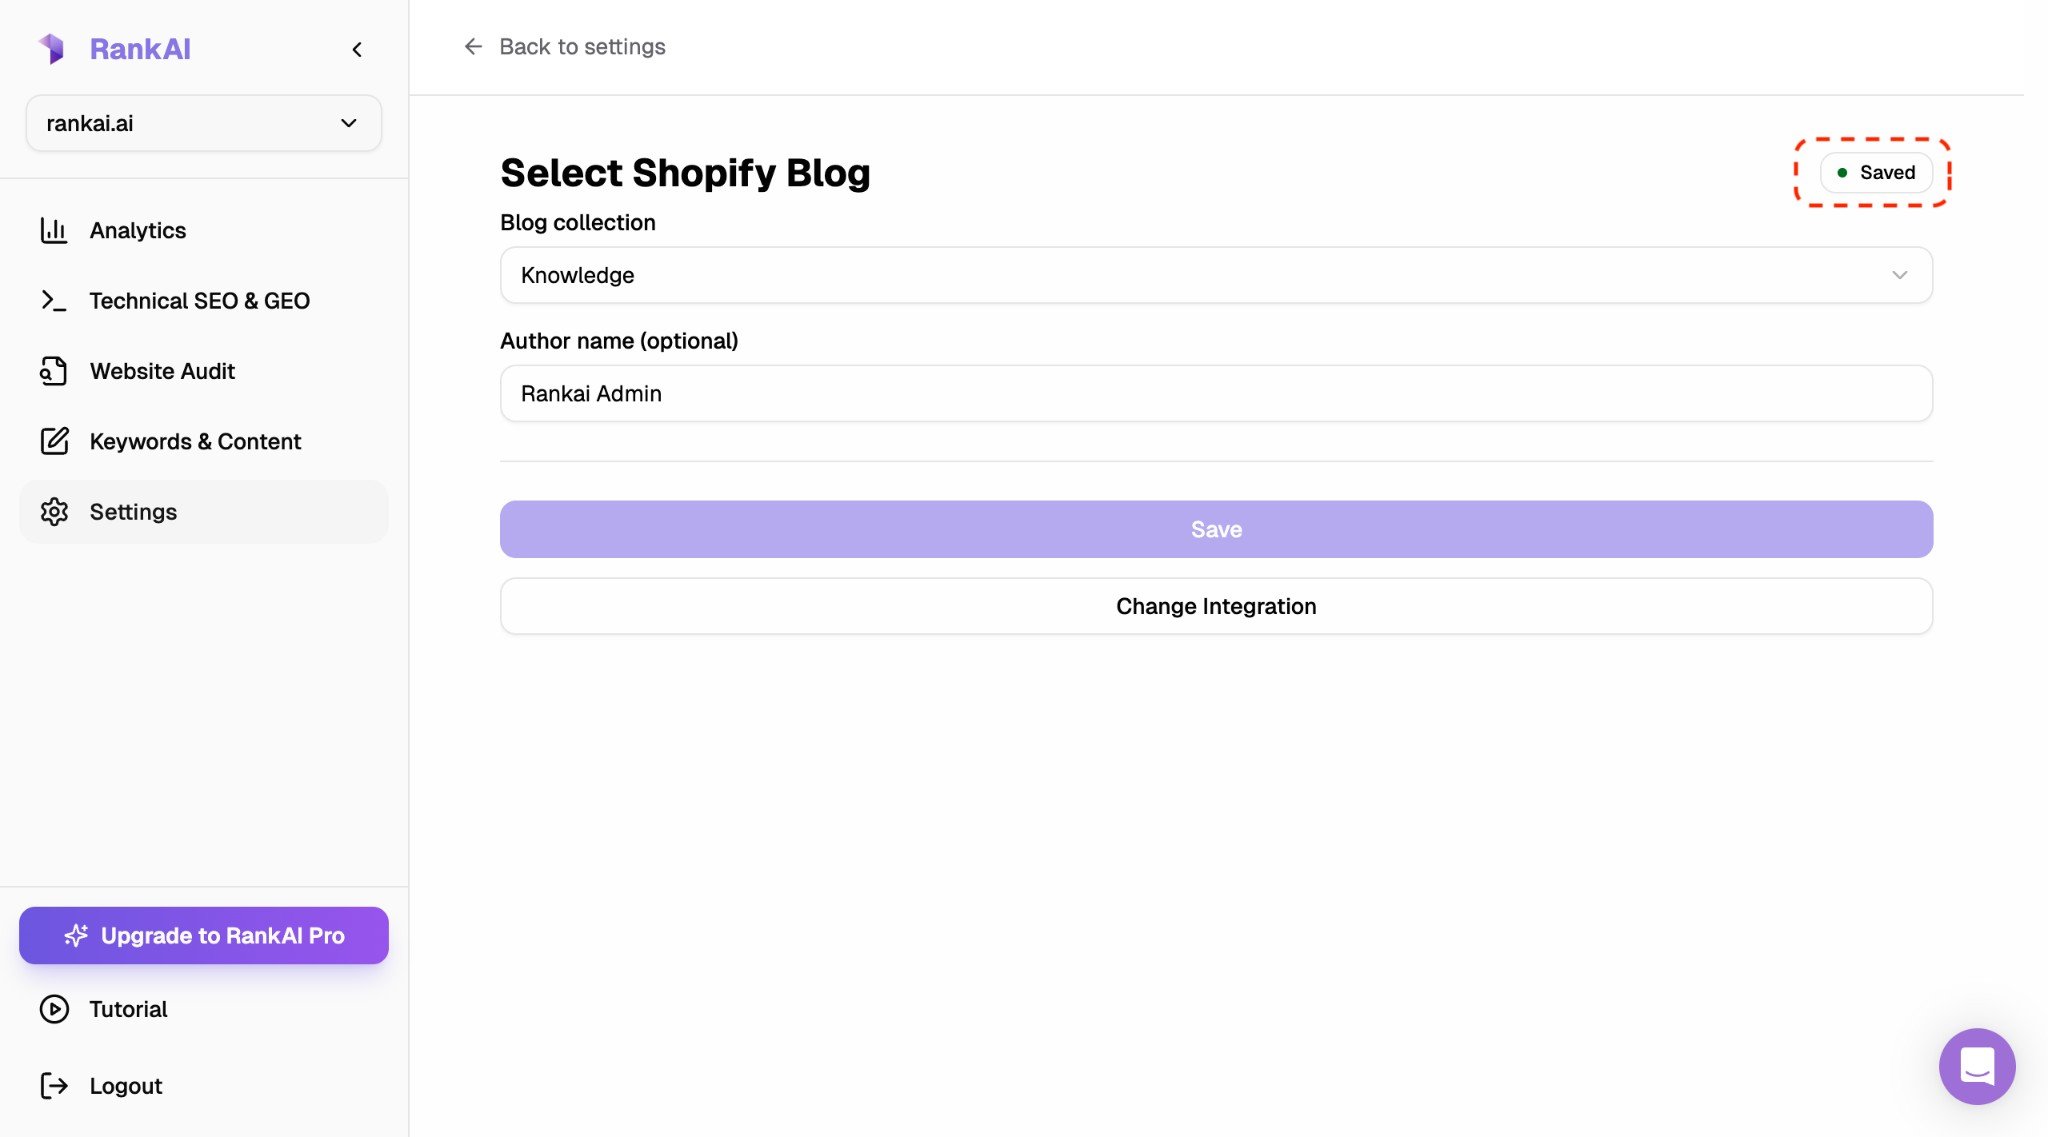 *After clicking Save, confirm the status shows “Saved” to complete the setup.*
You can change the blog or author later from the same screen, or use **Change Integration** to switch to a different CMS. Once you see **Saved**, your Shopify integration is ready and RankAI can publish to your selected blog.
## FAQ
### What if the connection fails?
Double-check that (1) your Admin Portal URL is the full URL from your browser when logged into Shopify Admin, (2) you’re using the Admin API access token (not a different key), and (3) the app has the required scopes (read\_content, write\_content, read\_themes, write\_themes) and is installed.
### I lost my Admin API access token. What do I do?
Shopify only shows the token once. Uninstall the app from your store, then create a new app (or create another app), configure the same scopes, install it, and reveal the new token. Paste the new token into RankAI.
### Where can I get more support?
Contact your RankAI account team or check the help section in your dashboard.
## Install the technical SEO & AEO script
The CMS connection above handles articles. Follow the separate [illustrated technical SEO & AEO setup](/integrations/technical-seo/shopify) to install the RankAI script.
***
*Last reviewed: October 12, 2026.*
This documentation is built and hosted on [Mintlify](https://mintlify.com), a developer documentation platform.
*After clicking Save, confirm the status shows “Saved” to complete the setup.*
You can change the blog or author later from the same screen, or use **Change Integration** to switch to a different CMS. Once you see **Saved**, your Shopify integration is ready and RankAI can publish to your selected blog.
## FAQ
### What if the connection fails?
Double-check that (1) your Admin Portal URL is the full URL from your browser when logged into Shopify Admin, (2) you’re using the Admin API access token (not a different key), and (3) the app has the required scopes (read\_content, write\_content, read\_themes, write\_themes) and is installed.
### I lost my Admin API access token. What do I do?
Shopify only shows the token once. Uninstall the app from your store, then create a new app (or create another app), configure the same scopes, install it, and reveal the new token. Paste the new token into RankAI.
### Where can I get more support?
Contact your RankAI account team or check the help section in your dashboard.
## Install the technical SEO & AEO script
The CMS connection above handles articles. Follow the separate [illustrated technical SEO & AEO setup](/integrations/technical-seo/shopify) to install the RankAI script.
***
*Last reviewed: October 12, 2026.*
This documentation is built and hosted on [Mintlify](https://mintlify.com), a developer documentation platform.